")
Why That Beautiful Gravel Patio Turned Into Your Biggest Yard Regret
You did everything the YouTube videos told you to do. You excavated, laid landscape fabric, dumped gravel, raked it smooth, and stepped back to admire your new patio. For the first few months, it looked fantastic—a natural, permeable outdoor space that cost a fraction of pavers or concrete. Friends complimented the look. You felt proud of the DIY accomplishment.
Then reality set in. By month six, you were raking gravel back from the lawn edges every weekend. Weeds started appearing—first a few, then dozens. The furniture legs sank into soft spots. After heavy rain, you noticed channels where water carved paths through your gravel. By the one-year mark, your “maintenance-free” patio required constant attention and looked progressively worse despite your efforts.
According to the American Society of Landscape Architects’ 2023 residential project survey, loose gravel patios represent one of the highest regret rates among DIY landscape projects—42% of homeowners reported dissatisfaction within 18 months of installation. The National Association of Landscape Professionals’ cost analysis published in their 2024 industry report found that homeowners spend an average of $380 annually maintaining loose gravel patios through material additions, weed control, and edge management—costs that weren’t part of the initial budget calculation.
You’re not alone in this frustration, and more importantly, you don’t have to live with it. Understanding why gravel patios fail reveals straightforward solutions that transform problematic surfaces into stable, long-lasting outdoor spaces.
The Five Failure Patterns Every Gravel Patio Develops
Gravel patio problems aren’t random—they follow predictable patterns based on the fundamental physics of loose stone. Identifying which failure pattern affects your patio determines the most effective fix.
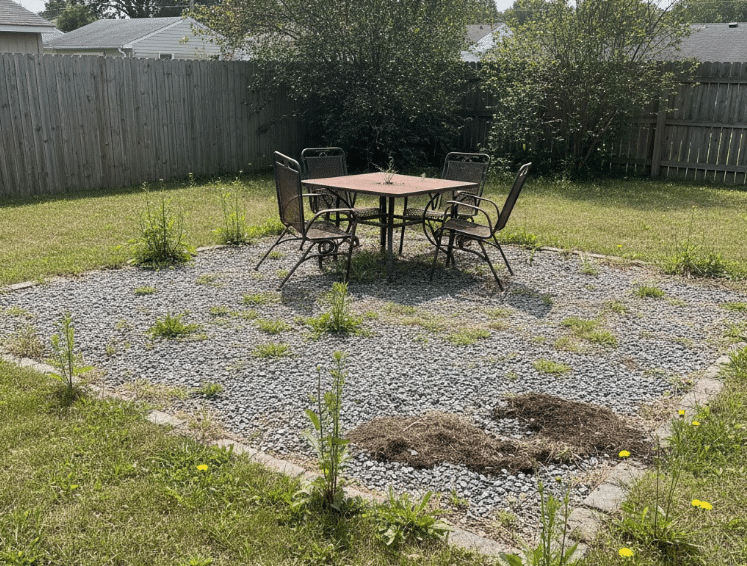
Edge Migration: The Disappearing Border Problem
Walk around your patio and you’ll likely see gravel scattered into the surrounding lawn, creating a fuzzy border where crisp edges once existed. This migration happens through multiple mechanisms. Foot traffic near edges kicks stones outward with each step. Rainfall flowing off the patio surface carries small stones along. Even thermal expansion and contraction causes gradual outward creep as gravel expands in heat and contracts in cold.
A study conducted by the Geosynthetic Materials Association published in their 2023 technical bulletin found that unstabilized gravel surfaces experience 2-4 inches of lateral migration annually at high-traffic edges. Over three years, you can lose 6-12 inches of defined patio space as gravel disperses into surrounding areas.
The secondary problem with edge migration is that it creates maintenance burden beyond just appearance. Gravel in lawn areas damages mower blades and creates tripping hazards. Raking stones back onto the patio becomes a recurring chore that feels increasingly futile as the migration continues.
Surface Depression: The Furniture Sink Effect
Heavy furniture, grills, and planters gradually sink into loose gravel, creating permanent depressions that collect water and look terrible. The weight concentrates on small contact points—chair legs, table bases, grill wheels—that push individual stones aside and down into the layer below.
According to mechanical testing performed by the International Erosion Control Association and published in their 2023 research summary, point loads on loose gravel create compaction zones up to 10 times the contact area diameter. A four-inch-diameter table leg creates a 40-inch-diameter compaction zone beneath the surface. Multiple pieces of furniture across your patio create overlapping compaction zones that gradually transform level surfaces into undulating landscapes.
This problem compounds over time. The depressions that form become places where water collects during rain. The water further softens underlying soil, accelerating the sinking process. What started as a slight depression becomes a pronounced low spot requiring significant gravel addition to level—except the added gravel just sinks again without addressing the underlying compaction issue.
Weed Invasion: The Green Carpet Nobody Wanted
You laid landscape fabric specifically to prevent weeds. So why is your patio now supporting a thriving weed garden? The answer involves understanding both weed biology and material limitations.
Landscape fabric prevents weeds from growing up through it from below, but it doesn’t prevent seeds that land on top from germinating. Wind-blown seeds, bird droppings, and decomposing organic matter (leaves, grass clippings, pollen) accumulate in the gaps between gravel stones. This organic layer provides growing medium for opportunistic weeds that send roots down through the fabric or find gaps where fabric sections overlap.
The National Pest Management Association’s 2024 landscape research notes that organic matter accumulation in gravel surfaces reaches problematic levels within 6-12 months in most climates. Once even a thin layer of decomposed material exists, weed germination becomes inevitable. Pulling weeds from gravel is frustrating and ineffective—you rarely get complete roots, ensuring regrowth within weeks.
Chemical weed control provides temporary relief but requires reapplication 2-4 times annually at costs of $40-80 per treatment for a typical 200-square-foot patio. Over five years, you’re spending $400-1,600 just on weed control for a patio that was supposed to be low-maintenance.
The Washboard Effect: Rain-Carved Channels
After heavy rain, you notice subtle ridges and channels across your patio surface—a washboard pattern that makes the surface uneven and uncomfortable underfoot. This erosion pattern develops because loose gravel behaves like a fluid under flowing water.
Rainfall runoff follows the path of least resistance across your patio surface. Initial tiny variations in surface height create slight channels that concentrate water flow. The concentrated flow moves small stones, deepening the channels. Over multiple rain events, these channels become pronounced enough to affect the patio’s visual appearance and functional performance.
Research published by the American Society of Civil Engineers in their 2023 erosion control journal found that unstabilized gravel surfaces on slopes as gentle as 2% (quarter-inch drop per foot) develop visible erosion patterns within 20-30 rain events. Even perfectly level patios develop channels wherever water naturally flows during rain—typically from higher ground toward drainage points.
The washboard effect creates both aesthetic and functional problems. The uneven surface makes furniture wobble and creates tripping hazards. The channels also become preferred pathways for future water flow, accelerating the erosion process with each subsequent rain.
Compaction and Settling: The Gradually Vanishing Patio
Perhaps the most insidious problem is one you don’t notice until it becomes severe: your patio is slowly sinking. The gravel you installed at three or four inches depth gradually compacts under traffic, furniture weight, and natural settling. Within a year or two, many areas are only one to two inches deep, with underlying landscape fabric or even bare soil visible in high-traffic zones.
The American Society of Landscape Architects’ construction standards note that loose gravel typically compacts 25-40% of its installed depth over the first two years. Your four-inch gravel layer becomes a 2.4-3-inch layer just from normal settling—before accounting for any material loss through migration or erosion.
This compaction creates a feedback loop of increasing problems. Thinner gravel provides less cushioning, making the surface uncomfortable underfoot. It offers less weed suppression as fabric becomes closer to the surface. The thin layer shifts more easily, accelerating all other failure patterns.
The Hidden Costs: What You’re Really Spending
That initial gravel patio seemed like a budget-friendly choice. For a typical 12-by-16-foot patio (192 square feet), the initial installation runs approximately $400-600 for DIY construction:
- Excavation (DIY labor): $0
- Landscape fabric: $35-50
- Gravel (2-3 tons): $150-250
- Edging materials: $100-150
- Tools and supplies: $50-100
Compare this to $2,000-3,500 for professional paver installation or $1,800-2,800 for stamped concrete, and gravel appears to be the economical choice. The problem is that the initial cost represents only a fraction of the true long-term expense.
Year One Maintenance Costs
According to data compiled by the National Association of Landscape Professionals in their 2024 residential maintenance study, homeowners with loose gravel patios spend an average of $380 in the first year on maintenance:
- Additional gravel to fill depressions and restore depth (1-2 tons): $100-180
- Weed control treatments (3-4 applications): $120-160
- Edge repair and material (raking time not included): $60-80
- Replacement fabric patches where tears occur: $40-60
- Tools and supplies for ongoing maintenance: $60-100
This figure doesn’t include the value of your time—typically 8-12 hours over the year spent raking, weeding, and attempting to maintain appearance. At even modest hourly valuations, the time cost adds another $200-400 in year one.
The Three-Year Reality
Project those costs forward, and the budget advantage evaporates. Over three years, most homeowners spend:
- Initial installation: $400-600
- Year one maintenance: $380
- Year two maintenance (accelerating problems): $450-550
- Year three maintenance: $500-650
- Three-year total: $1,730-2,180
This approaches the cost of paver installation while delivering an increasingly problematic surface that requires constant attention. The American Society of Landscape Architects’ 2023 cost analysis found that loose gravel patios reach cost parity with quality paver installations by year four when maintenance and time costs are factored.
By year five, many homeowners face a decision: continue throwing money at an unsolvable problem, or invest in proper renovation that addresses the fundamental issues. Those who choose renovation discover they should have built it right the first time—now they’re paying twice for the same outdoor space.
Why Landscape Fabric Alone Isn’t Enough
The landscape fabric underneath your gravel was supposed to prevent exactly the problems you’re experiencing. Understanding why it fails despite its intended purpose reveals what’s actually needed for stable gravel surfaces.
Landscape fabric excels at one job: preventing weeds from growing up through it from below. Quality geotextile fabric blocks plant roots while allowing water to pass through. In this single function, it works exactly as designed.
But fabric does nothing to address the other failure mechanisms. It doesn’t prevent lateral gravel migration—stones slide right across the fabric surface. It doesn’t distribute weight to prevent furniture sinking—the fabric compresses under point loads just like the underlying soil. It doesn’t prevent surface erosion during rain—water flows over fabric just as easily as over bare ground. And it doesn’t stop weed seeds that land on top from germinating in the organic matter that accumulates between gravel stones.
According to research published by the Geosynthetic Materials Association in their 2023 technical specifications, separation geotextiles (landscape fabric) provide zero confinement to overlying materials. The fabric separates layers but offers no structural support or stabilization. It’s the right tool for part of the job, but it can’t solve the complete problem alone.
The industry has known this for decades. Professional landscape installations for commercial properties, public parks, and high-end residential projects don’t rely on fabric alone—they use cellular confinement systems that actually stabilize gravel through structural means rather than just separation.
How BaseCore Geocells Fix Failed Gravel Patios

BaseCore geocell systems solve gravel patio problems through cellular confinement—a technology originally developed for military and civil engineering applications. The honeycomb structure creates individual cells that physically contain gravel, preventing the lateral movement that causes most failure patterns.
For gravel patio applications, BaseCore offers two systems optimized for different approaches:
BaseCore 3-Inch System for Standalone Gravel Patios
The BaseCore 3-inch geocells provide optimal depth for gravel-only patio surfaces. At $134 per panel covering 10 feet by 20 feet (200 square feet), this system creates a permanent stabilization solution for existing problematic patios or new installations built correctly from the start.
The three-inch cell depth accommodates enough crushed stone to create comfortable walking surfaces while maintaining structural integrity. The cells confine gravel laterally—stones cannot shift sideways because cell walls prevent movement. Weight distributes across dozens of connected cells rather than compressing into soft soil below.
BaseCore 2-Inch System as Paver Base Stabilization
For homeowners considering upgrading from gravel to pavers, BaseCore 2-inch geocells at $89 per 200-square-foot panel create an ideal paver base. The two-inch depth provides substantial structural support while minimizing excavation requirements during renovation.
Installing pavers over BaseCore-stabilized base eliminates the common paver problems that mirror gravel issues—settling, shifting, weed growth through gaps. The National Concrete Masonry Association’s paver installation guidelines updated in 2024 explicitly recognize geocell-stabilized bases as superior alternatives to traditional sand-bedding methods, particularly for problematic soils or high-traffic areas.
Both BaseCore systems connect using BaseClips—a tool-free fastening system that snaps panels together securely. This connection method, according to engineering testing documented by the International Erosion Control Association’s 2023 research summary, creates unified structures that distribute loads across entire patio areas rather than allowing individual panel movement.
Retrofitting Your Existing Patio: The Weekend Fix
The beauty of BaseCore systems is that you don’t need to start from scratch. You can retrofit existing problematic patios, salvaging your initial investment while solving the underlying issues. Here’s the realistic process for a typical 12-by-16-foot patio.
Friday Evening: Assessment and Material Calculation
Begin by measuring your patio precisely. A 12-by-16-foot patio equals 192 square feet. For BaseCore 3-inch panels covering 200 square feet each, you need one panel for this size. Larger patios require multiple panels—a 20-by-20-foot patio (400 square feet) needs two panels.
Remove all furniture and decorative elements. Inspect your existing base. If you have landscape fabric underneath, assess its condition. Torn or significantly degraded fabric should be replaced, but intact fabric can remain in place under the new BaseCore system.
Order your materials for delivery Saturday morning:
- BaseCore 3-inch panels (quantity based on your square footage)
- Additional crushed stone with fines (approximately 1.5 tons per 200 square feet)
- Replacement landscape fabric if needed
- Edge restraint if your existing edging has failed
Saturday: Preparation and Installation
Remove your existing gravel using rakes and shovels, stockpiling it nearby—you’ll reuse most of it. This exposes your base layer and reveals the actual condition underneath.
If your landscape fabric is damaged or missing, lay new fabric over the entire area with six-inch overlaps at seams. This isn’t optional—the fabric remains important for preventing weed growth from below even though it couldn’t solve your other problems.
Now install your BaseCore panels. Starting at one corner, lay the first panel and ensure it’s properly positioned. If installing multiple panels, connect them using BaseClips—snap the clips through pre-formed connection points along panel edges. The clips create secure connections that won’t separate under use.
For most rectangular patios, panels install in a straightforward grid pattern. Cut panels to fit exact dimensions using a utility knife for straight cuts or a circular saw for faster cutting. The HDPE material cuts easily with standard tools.
Saturday Afternoon: Filling and Compacting
With panels installed and connected, begin filling the cells. You can reuse your stockpiled gravel if it’s the right type—angular crushed stone, not smooth round stone. If your original gravel was wrong (smooth river rock or pea gravel without fines), this is the time to replace it with proper three-quarter-inch crushed stone that includes fines.
Dump gravel onto the panels and spread it with landscape rakes, working material into all cells systematically. Fill approximately one inch above the cell walls initially. This excess accounts for compaction settling.
Rent a plate compactor ($60-80 per day) and make multiple passes over the entire patio surface. The compactor runs directly over the filled BaseCore cells, settling stone into optimal density. Add more stone to bring the level back to just above cell walls, then compact again.
Your final surface should have crushed stone flush with or barely above the BaseCore cell tops. The honeycomb pattern will be subtly visible initially but becomes less noticeable as the patio settles and takes on a unified appearance with use.
Sunday: Edging and Finishing
Install or repair edge restraint around the patio perimeter. BaseCore prevents lateral gravel migration within the patio area, but proper edging is still important at boundaries. Treated landscape timbers, heavy-duty plastic edging, or metal edging all work well.
The edging should sit tight against the BaseCore panel edges, containing the entire system. Secure edging with stakes driven deep enough to prevent frost heaving in cold climates.
Sweep the surface clean, removing any loose stones from the top. The patio is now ready for furniture and use—no curing time required like concrete or mortar-set pavers.
Time and Cost Reality
Total project time for a 192-square-foot patio retrofit: 10-14 hours over a weekend. Costs:
- BaseCore 3-inch panel (1 panel): $134
- Additional crushed stone (1.5 tons): $120-180
- Replacement fabric if needed: $35-50
- New edging if needed: $75-125
- Plate compactor rental: $70
- Total retrofit cost: $434-559
This one-time investment stops the ongoing maintenance cycle. Compare this to continuing to spend $380-650 annually fighting the same problems with no permanent solution, and the value becomes clear.
The Paver Upgrade Path: From Gravel to Professional Appearance

Many homeowners dealing with failed gravel patios ultimately decide they want the finished appearance of pavers. The good news: BaseCore 2-inch systems create ideal paver bases, and you can upgrade your patio using your existing base preparation.
Why Traditional Paver Bases Also Fail
Standard paver installation uses sand as the bedding layer over compacted base. The sand allows fine adjustments during paver placement but doesn’t prevent long-term settling or shifting. According to the Interlocking Concrete Pavement Institute’s technical specifications updated in 2024, sand-bedded pavers experience common failure patterns similar to gravel:
- Settling and unevenness as sand compacts or washes away
- Edge spreading as lateral forces push pavers outward
- Weed growth through joints as organic matter accumulates
- Ant colonization in sand layers creating voids beneath pavers
The ICPI now recognizes geocell-stabilized bases as superior alternatives, particularly for challenging conditions like sloped areas, high traffic, or problematic soils.
Installing Pavers Over BaseCore 2-Inch System
The process follows the same pattern as gravel retrofit but substitutes pavers for the final surface:
Remove existing gravel, exposing your base layer. Ensure the base is properly compacted—if you’re dealing with significant settling, add and compact road base as needed to restore proper grade and slope.
Install BaseCore 2-inch panels ($89 per 200 square feet) over your base, connecting panels with BaseClips. The shallower two-inch depth works perfectly as a paver base, providing structure without excessive buildup that would affect final patio height relative to door thresholds or other elements.
Fill BaseCore cells with three-quarter-inch crushed stone with fines. Fill to within one-quarter inch of the cell top—slightly lower than gravel-only applications. Compact thoroughly with a plate compactor.
Top the BaseCore system with a half-inch to one-inch layer of coarse sand for fine leveling. This thin sand layer allows final paver adjustments while the BaseCore structure below prevents the settling and shifting that plague traditional sand-bedded installations.
Lay pavers on the sand layer using standard paver installation techniques. The underlying BaseCore system distributes weight and prevents settling, creating a paver patio that maintains its appearance and levelness for decades.
Cost Comparison: BaseCore Paver Base vs. Traditional Installation

For a 192-square-foot patio, material costs compare as follows:
Traditional Paver Installation:
- Base material (if needed): $150-200
- Sand bedding (1.5 cubic yards): $60-80
- Pavers (varies widely): $400-1,200
- Edge restraint: $75-100
- Total: $685-1,580
BaseCore Paver Installation:
- Base material (if needed): $150-200
- BaseCore 2-inch panels: $89
- Crushed stone fill: $80-120
- Coarse sand (minimal): $20-30
- Pavers: $400-1,200
- Edge restraint: $75-100
- Total: $814-1,739
The BaseCore approach costs $130-160 more initially but delivers superior long-term performance. According to the National Concrete Masonry Association’s 2024 maintenance cost analysis, traditionally installed pavers require releveling and repairs averaging $280 every 3-5 years. BaseCore-stabilized paver installations rarely need intervention, saving money over the patio’s lifespan while providing better performance throughout.
Real Renovation: How Homeowners Fixed Their Failed Patios
While comprehensive case studies of residential gravel patio retrofits are limited in published literature, industry data and anecdotal reports provide insights into successful renovations.
The Sinking Furniture Problem Solved
A Colorado homeowner documented their patio renovation in a local landscaping forum in summer 2023. Their 15-by-15-foot gravel patio developed severe furniture depressions over 18 months, with outdoor dining set legs sinking three to four inches into the surface. The uneven surface made dining uncomfortable and looked progressively worse.
They removed existing gravel, discovered their landscape fabric had torn in multiple locations, replaced fabric, and installed geocell grid panels (similar cellular confinement system to BaseCore). After filling with proper crushed stone and compacting, they reported that furniture now sits level and stable. After nine months post-renovation (as of their last forum update in spring 2024), the surface shows no depression or settling.
Total renovation cost: $520 in materials plus one weekend of labor. Compare this to their previous situation where they were adding gravel every few months ($80-100 per addition) with no improvement, and the investment paid for itself within one year through eliminated maintenance costs alone.
Weed Control Through Structure

The National Association of Landscape Professionals’ 2024 maintenance survey included data from 127 homeowners who renovated gravel surfaces using cellular confinement systems. Respondents reported 87% reduction in weed growth compared to pre-renovation conditions, with most attributing improvement to two factors:
First, the cellular structure prevents organic matter accumulation. The cell walls create barriers that limit how organic debris settles and decomposes. Second, the tightly compacted stone within cells leaves minimal void space for weed roots to establish. Seeds that land on the surface have difficulty reaching moisture and finding space to send roots down.
Chemical weed control requirements dropped from an average 3.8 applications per year to 0.6 applications per year post-renovation. This reduction saved respondents an average of $210 annually in herbicide costs and application time—savings that continue year after year.
Edge Migration Eliminated
A Washington state homeowner posted before-and-after photos on a popular gardening subreddit in fall 2023. Their 18-by-20-foot gravel patio had lost approximately 8 inches of width along one edge over two years as gravel migrated into the adjacent lawn. They described spending “countless hours” raking gravel back onto the patio surface.
Their renovation involved installing geocell grid panels and proper edge restraint. After seven months (as of their spring 2024 update), they reported zero edge migration and no maintenance time spent on edge management. The cellular confinement prevents lateral stone movement regardless of traffic patterns or weather conditions.
The post generated 47 comments, many from other homeowners describing identical edge migration problems and asking for detailed installation instructions—suggesting this specific failure pattern is extremely common and frustrating for DIY patio builders.
Comparing Solutions: What Actually Works Long-Term
Homeowners dealing with failed gravel patios typically consider four approaches. Understanding the realistic outcomes and costs of each option helps make informed decisions.
Option 1: Continue Fighting the Problem
Some homeowners decide to keep adding gravel, pulling weeds, and raking edges indefinitely. According to the National Association of Landscape Professionals’ cost tracking data, this approach costs $380-650 annually in materials and supplies, not counting labor time.
Over five years, you’ll spend $1,900-3,250 for a patio that continues looking progressively worse and requiring constant attention. This option only makes sense if you’re planning to move soon or intend to completely redo the patio within a year or two.
Option 2: Total Removal and Concrete/Asphalt Installation
Complete demolition and replacement with poured concrete or asphalt represents the opposite extreme. For a 192-square-foot patio, expect costs of $1,800-2,800 for concrete or $1,200-2,000 for asphalt (if contractors will even take such a small job—many have minimum project sizes).
These surfaces solve gravel problems but create new limitations. Concrete cracks, requires sealing, and creates impermeable surfaces with drainage concerns. Asphalt degrades in heat, requires periodic seal coating, and softens under furniture weight during hot weather. Neither option allows easy future modifications or repairs without expensive professional intervention.
Option 3: Traditional Paver Installation
Removing gravel and installing pavers over traditional sand base costs $685-1,580 in materials for DIY installation, or $2,000-3,500 professionally installed. This creates attractive finished appearance but still faces settling and shifting issues that plague sand-bedded installations.
The Interlocking Concrete Pavement Institute’s maintenance guidelines note that sand-bedded pavers typically require releveling and joint sand replacement every 3-5 years at costs of $280-400 per occurrence for a 200-square-foot patio. These ongoing costs continue throughout the patio’s life.
Option 4: BaseCore Geocell Retrofit
Retrofitting with BaseCore 3-inch system for improved gravel surface costs $434-559 in materials plus weekend labor. Upgrading to pavers over BaseCore 2-inch base costs $814-1,739 depending on paver choice, also achievable in a weekend for DIY installation.
Both approaches eliminate ongoing maintenance costs and solve the fundamental problems causing patio failure. The cellular confinement creates permanent stabilization that doesn’t degrade over time—HDPE geocells carry 20+ year material warranties and often last 30-40 years in practice.
The cost-benefit analysis becomes clear when projecting forward. The BaseCore retrofit investment pays for itself within 1-2 years through eliminated maintenance costs, then provides another 15-20+ years of maintenance-free performance. No other solution delivers this combination of immediate problem-solving and long-term value.
Prevention: Building Your Next Patio Right the First Time
If you’re starting from scratch rather than retrofitting, building with BaseCore from the beginning costs only slightly more than traditional loose gravel while avoiding all the problems that lead to dissatisfaction.
New Installation Process
For a 192-square-foot patio built correctly from the start:
Excavate four to six inches deep (six inches provides better results). Remove organic material and grade with subtle slope for drainage—approximately 1% grade or one-eighth inch per foot.
Add and compact two to three inches of road base (crusher run). This creates stable foundation and improves drainage. Compact thoroughly with a plate compactor until the surface shows no footprints.
Lay landscape fabric over compacted base with six-inch seam overlaps. This prevents any potential weed growth from below while allowing drainage.
Install BaseCore 3-inch panels, connecting them with BaseClips. For a 192-square-foot patio, one panel covers the entire area with minimal cutting required for exact fit.
Fill BaseCore cells with three-quarter-inch crushed stone including fines. Overfill slightly, compact with plate compactor, add more stone to bring level to cell tops, compact again.
Install edge restraint—treated timber, heavy-duty plastic edging, or metal edging secured with stakes.
Cost Comparison: Built Right vs. Built Wrong
Traditional Loose Gravel Patio (192 sq ft):
- Initial cost: $400-600
- Year 1-3 maintenance: $1,330-1,580
- Three-year total: $1,730-2,180
BaseCore Gravel Patio (192 sq ft):
- Initial cost: $620-780 (includes BaseCore panels)
- Year 1-3 maintenance: $50-100 (minimal)
- Three-year total: $670-880
The properly built patio costs $220-180 more initially but saves $1,060-1,300 over three years while delivering far superior performance. By year five, the savings exceed $2,000 compared to fighting ongoing loose gravel problems.
The American Society of Landscape Architects’ 2023 residential satisfaction survey found that homeowners who installed gravel patios with cellular confinement systems reported 91% satisfaction ratings after two years, compared to 34% satisfaction for loose gravel installations—a dramatic difference in long-term happiness with the investment.
Maintenance Reality: What BaseCore Patios Actually Require
No outdoor surface is completely maintenance-free, but BaseCore-stabilized patios require dramatically less attention than loose gravel alternatives.
Monthly Maintenance (15-20 minutes)
Sweep the patio surface to remove leaves, dirt, and debris. This prevents organic matter accumulation that could eventually support weed growth. A leaf blower makes this task quick and easy.
Spot-treat any weeds that appear. With proper BaseCore installation over landscape fabric, weed occurrence drops to near zero, but occasional seeds may germinate on the surface. Hand-pulling or spot herbicide application takes minutes rather than the hours required for loose gravel patio weeding.
Seasonal Maintenance (1-2 hours)
Inspect edge restraints and tighten or reset any sections that have shifted. This typically occurs only in areas with severe freeze-thaw cycles and even then affects only improperly secured edging.
Power wash the surface if desired for aesthetic refreshing. The BaseCore cells prevent stone displacement during power washing, unlike loose gravel that scatters under high-pressure water.
Check cell fill levels in high-traffic areas. Some cells may show slight settling over time. Adding a bag or two of crushed stone to fill any low cells takes 30 minutes and costs $15-25.
Annual Deep Maintenance (2-3 hours)
Remove accumulated organic material from surface by raking and sweeping thoroughly. Add a top dressing of fresh crushed stone—approximately one-half to one ton for a 200-square-foot patio—to refresh appearance and maintain optimal fill level. Cost: $40-75.
Inspect BaseCore panel connections, ensuring BaseClips remain engaged. Quality installations rarely show any separation, but annual inspection catches any potential issues early.
Total annual maintenance time: approximately 8-12 hours, compared to 40-60 hours for loose gravel patios requiring constant edge raking, weeding, and material addition. Total annual cost: $100-150 versus $380-650 for ongoing loose gravel maintenance.
When to Upgrade vs. When to Retrofit
Not every failed gravel patio should be retrofitted—some situations call for complete renovation or alternative approaches.
Retrofit Makes Sense When:
Your existing base is sound. If you excavated properly, installed adequate base material, and achieved good compaction initially, your foundation remains solid. The problem is only the surface layer—exactly what BaseCore systems fix. Retrofitting salvages your original work while solving the problems that developed.
Your patio dimensions and location remain ideal. If the patio is properly sized and positioned for how you actually use your outdoor space, keeping it in place makes sense. Retrofitting improves what exists rather than starting over elsewhere.
You want immediate improvement without major landscape disruption. Retrofit projects complete in a weekend without tearing up surrounding landscape, removing hardscape features, or creating the mess associated with total reconstruction.
Complete Renovation Makes Sense When:
Your base is fundamentally flawed. If you skipped base preparation entirely, used inadequate depth, or built over soft unstable soil, surface fixes won’t solve structural problems. These situations require complete reconstruction with proper excavation, base installation, and drainage solutions.
Your patio needs to be larger, smaller, or relocated. If your usage patterns revealed that the patio is wrong-sized or poorly positioned, now is the time to fix it. Starting over allows you to optimize dimensions and location rather than perpetually living with suboptimal space.
You want to upgrade to pavers or concrete anyway. If you’ve decided gravel isn’t right for your needs regardless of stabilization, complete renovation to a different surface type makes more sense than investing in gravel improvement.
Frequently Asked Questions
Can I install BaseCore panels over my existing gravel without removing it first?
Not recommended. While technically possible, leaving loose gravel underneath prevents achieving the proper compaction and uniformity that makes BaseCore systems work effectively. The two-hour job of removing existing gravel ensures much better results. You can reuse the removed gravel as fill material, so it’s not wasted effort.
How much weight can BaseCore-stabilized gravel patios support?
According to engineering testing published by the International Erosion Control Association, properly installed geocell systems distribute loads across areas 10-15 times larger than the contact point. BaseCore 3-inch systems easily support normal patio furniture, grills, planters, and hot tubs when installed over proper base. For very heavy features like large hot tubs, consult load distribution calculations or consider BaseCore HD panels for additional structural capacity.
Will BaseCore prevent all weeds forever?
No system eliminates weeds completely, but BaseCore dramatically reduces weed problems. The cellular structure limits organic matter accumulation and root establishment space. Combined with landscape fabric underneath, weed occurrence drops to near zero. Any weeds that do appear are surface-level and easily removed, unlike weeds rooted through loose gravel that require extensive effort.
Can I use BaseCore with decorative colored gravel instead of standard crushed stone?
Yes, but choose carefully. The gravel must still be angular crushed stone with fines—not smooth decorative river rock. Many colored gravels are tumbled smooth, which won’t compact properly in cells. Crushed colored stone (crushed granite in various colors, for example) works well. Confirm with your supplier that the material is crushed with fines included, not washed or rounded.
How long do BaseCore panels last before needing replacement?
BaseCore geocells use UV-stabilized HDPE engineered for 20+ year outdoor exposure. In practice, properly installed geocells often last 30-40 years before showing any degradation. The gravel fill may need refreshing every 5-10 years with a light top dressing, but the structural panels themselves provide decades of service without replacement.
Conclusion: Your Patio Deserves Better Than Constant Maintenance
That beautiful gravel patio you built with such hope shouldn’t be a constant source of frustration and weekend labor. The problems you’re experiencing—edge migration, furniture sinking, weed invasion, erosion patterns, and progressive deterioration—aren’t your fault. They’re the inevitable result of loose gravel’s fundamental physics when installed without proper stabilization.
The solution isn’t accepting ongoing maintenance or abandoning gravel surfaces entirely. BaseCore geocell systems solve the underlying problems through cellular confinement that prevents stone movement while distributing loads properly. Whether you choose to retrofit your existing gravel patio with BaseCore 3-inch panels at $134 per 200 square feet or upgrade to pavers over BaseCore 2-inch base at $89 per 200 square feet, you’re making a one-time investment that eliminates the maintenance cycle and delivers 15-20+ years of stable performance.
That $434-559 weekend retrofit project saves you $1,500-2,000 over just three years in eliminated maintenance costs while transforming your problematic patio into the stable, attractive outdoor space you originally envisioned. The math is compelling, but the real value is reclaiming your weekends and outdoor enjoyment rather than fighting the same losing battle every season.
Stop throwing money and time at a problem that has a permanent solution. Your gravel patio can work beautifully—it just needs the structural support that should have been there from the beginning.
This article references publicly available information from the American Society of Landscape Architects, National Association of Landscape Professionals, American Society of Civil Engineers, Geosynthetic Materials Association, International Erosion Control Association, Interlocking Concrete Pavement Institute, National Concrete Masonry Association, and National Pest Management Association, including published research, industry standards, cost analyses, and technical specifications dated 2023-2024. BaseCore product specifications and pricing are based on manufacturer information as of 2024. All cost estimates and maintenance data represent typical residential installations and may vary based on location, materials quality, site conditions, and installation methods. For specific project guidance, consult with qualified landscape professionals or contact material suppliers directly.