
Every homeowner who has built a gravel path knows the frustration: within months, the edges scatter into the lawn, the center develops bare spots, and rain carves miniature canyons through what was supposed to be a permanent walkway. The problem isn’t your gravel—it’s that loose stone has nothing holding it in place.
A geocell ground grid solves gravel path instability by confining aggregate inside interconnected cells that prevent lateral migration, distribute foot traffic evenly, and allow rainwater to drain straight through. This cellular confinement system locks every stone in position while eliminating the mud, erosion, and annual re-graveling that plague traditional loose-fill paths. Backyard Bases’ BaseCore™ geocell system gives DIY homeowners a single-weekend solution that lasts decades without concrete, heavy equipment, or professional contractors.
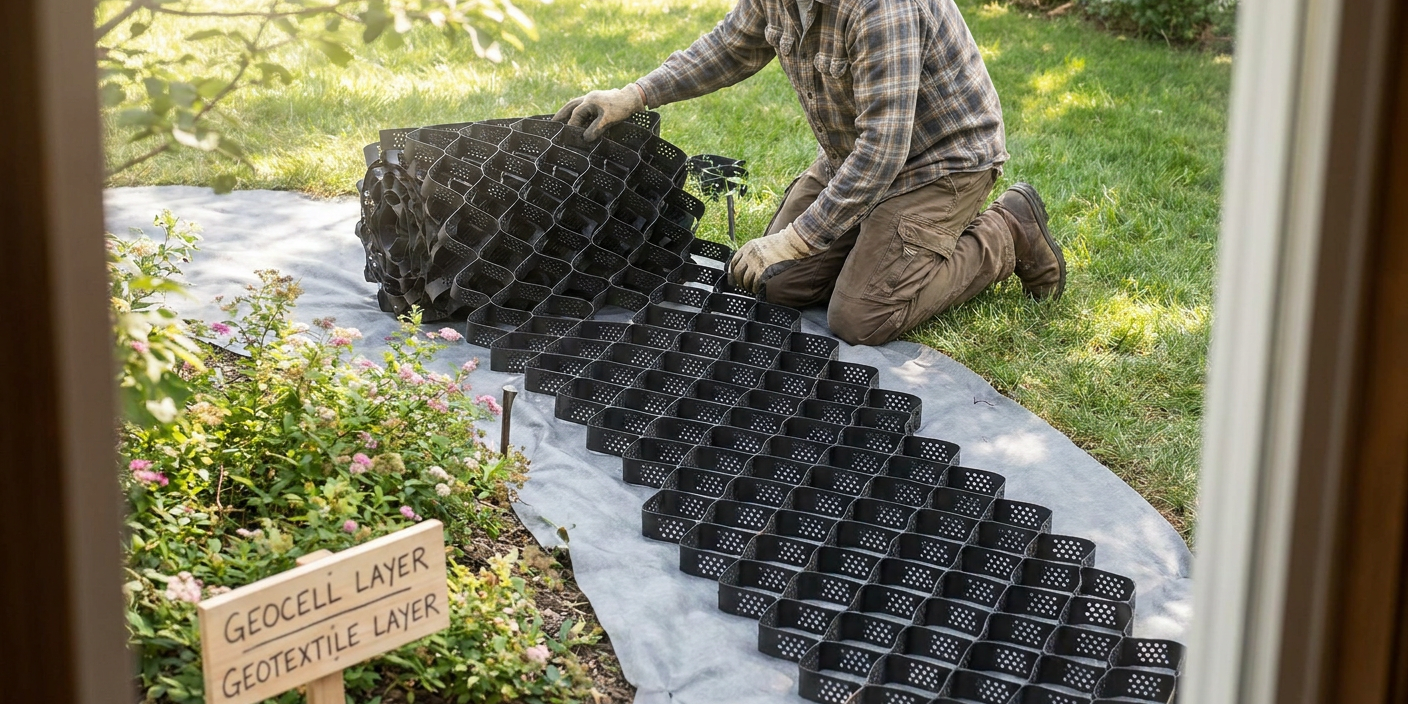
Homeowners can easily install geocell grids without specialized heavy machinery.
This guide covers why gravel paths fail, how geocell technology prevents those failures, and the exact step-by-step process to build a stabilized gravel path yourself—including materials, measurements, and common mistakes to avoid.
Why Gravel Paths Fail: The Engineering Problem
That beautiful gravel path you installed last spring didn’t fail because you bought cheap stone or skipped a step. It failed because of physics—specifically, three engineering problems that affect every loose-fill surface.
No Lateral Confinement
What it looks like: Gravel spreads outward into surrounding lawn or beds, leaving thin coverage in high-traffic areas.
Documented cause: When you step on loose aggregate, the downward force pushes stones sideways. Without a rigid structure to resist this lateral movement, gravel migrates away from where you need it most. According to Penn State Extension research on aggregate surfaces, unconfined gravel can lose 20-30% of its coverage annually in pedestrian applications.
Weak or Saturated Subgrade
What it looks like: Soft spots, sinking sections, and gravel that seems to disappear into the ground.
Documented cause: Your native soil—especially clay-heavy soil—absorbs water and loses bearing capacity. Heavy foot traffic pushes gravel down into the softened subgrade, where it mixes with mud and becomes structurally useless. The gravel didn’t vanish; it sank.
No Water Management
What it looks like: Washouts after rain, channeling down the center of the path, erosion at edges.
Documented cause: Water follows the path of least resistance. Without proper drainage planning, runoff concentrates in low spots and carries gravel with it. The driveway erosion control guide from Backyard Bases explains how this same principle affects driveways, parking pads, and walkways alike.
The typical DIY fix—dumping more gravel on top—treats the symptom while ignoring the cause. Within a season, you’re back to the same spreading, sinking, and washing. The real solution addresses all three root causes simultaneously.
How Geocell Stabilizes Gravel Paths Permanently
Geocell technology was originally developed for military applications—stabilizing roads and airfields over weak soils in remote locations. The same engineering principles that keep tanks from sinking into mud will keep your gravel path locked in place for decades.
Cellular Confinement Prevents Migration
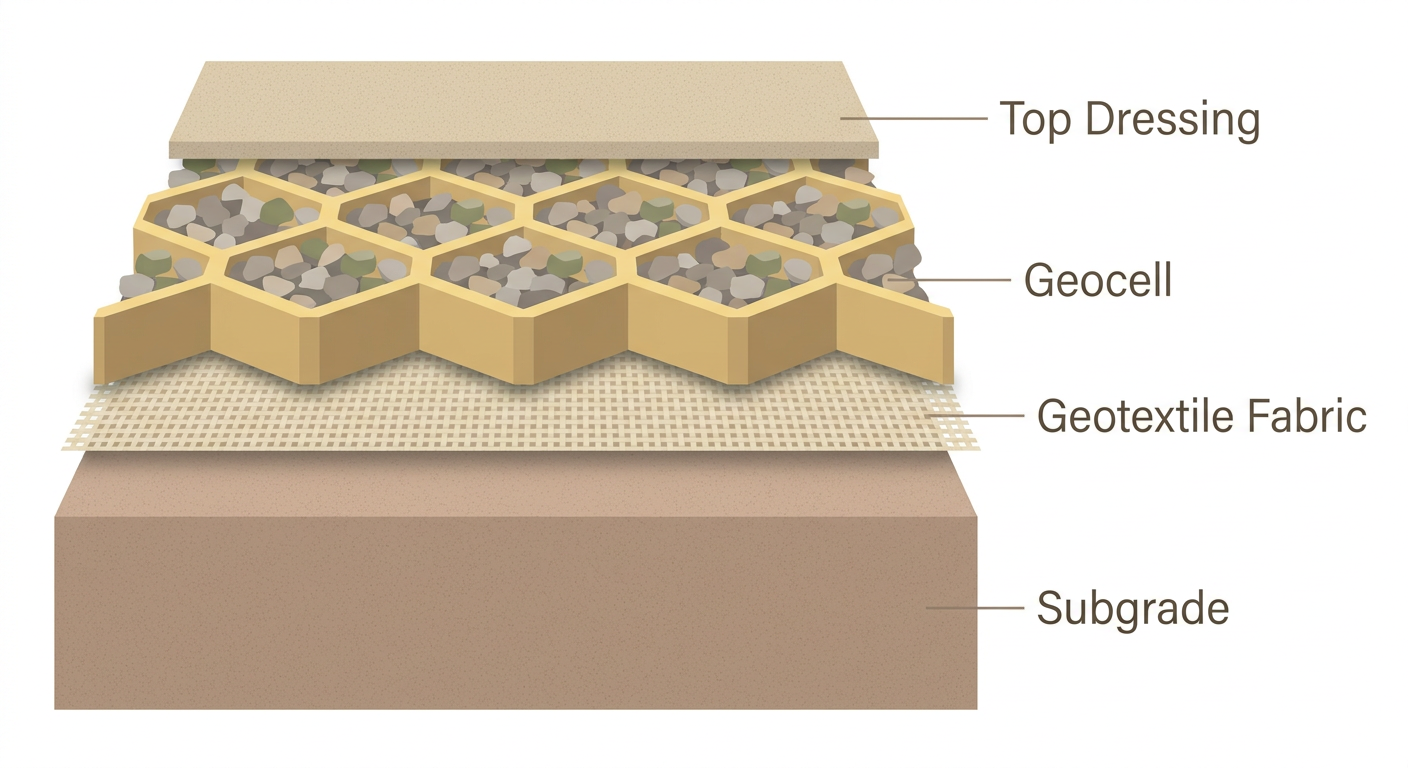
BaseCore™ geocell consists of interconnected HDPE cells that expand into a honeycomb pattern. When you fill these cells with gravel, each stone becomes locked in position by the cell walls surrounding it. Foot traffic pushes down, but the gravel can’t spread sideways—the cell walls absorb and redirect that lateral force.
Think of it like an ice cube tray filled with marbles. Push down on one section, and the marbles compress against each other and the tray walls instead of scattering across the counter.
Load Distribution Protects the Subgrade
The geocell structure spreads point loads across a wider area. When you step on one cell, the force transfers through the cell walls to neighboring cells, distributing your weight across multiple square feet instead of concentrating it under your heel. This protects the subgrade from compression and prevents gravel from being pushed down into soft soil.
The geocell technology overview explains how this load distribution works across different applications—from pedestrian paths to vehicle driveways.
Drainage Without Erosion
Unlike concrete or solid pavers, geocell-stabilized gravel remains fully permeable. Rainwater drains straight through the aggregate and into the ground, eliminating the surface runoff that causes erosion. The cell structure slows water velocity while maintaining drainage, so you get permeability without washout.
When paired with geotextile fabric underneath, the system also prevents fine soil particles from migrating up into the gravel—addressing the subgrade separation problem at the same time.
Ready to build a gravel path that stays put? Shop BaseCore™ geocell kits at backyardbases.com/order-now or call 888-897-2224 for help sizing your project.
Step-by-Step: How to Stabilize a Gravel Path with Geocell
This installation process works for garden paths, walkways between structures, side-yard access routes, and any pedestrian-only gravel surface. A typical 3-foot by 20-foot path takes 4-6 hours to complete.
Tools and Materials Needed
- BaseCore™ geocell in 2-inch depth (recommended for pedestrian paths)
- Geotextile fabric (sold by Backyard Bases or available at landscape suppliers)
- Steel edging or BaseEdge HD (optional but recommended for clean borders)
- Crushed angular gravel: 3/8-inch to 3/4-inch size (calculate approximately 0.5 cubic yards per 10 square feet of path at 2-inch depth)
- Landscape stakes or J-pins for securing geocell
- Shovel and rake
- Tape measure
- Utility knife or tin snips for trimming geocell
- Wheelbarrow
- Hand tamper or plate compactor (rental available at most hardware stores)
Step 1: Plan Your Path Layout
Mark your path boundaries with stakes and string line or landscaping spray paint. Standard garden path widths range from 2 feet (single-file) to 4 feet (two people walking side-by-side). For most backyard applications, 3 feet provides comfortable access.
Use the foundation calculator to determine exactly how much BaseCore™ and gravel you need based on your path dimensions.
Step 2: Excavate the Path Area
Remove existing sod, topsoil, and organic material to a depth of 3-4 inches below your desired finished grade. For a 2-inch geocell with gravel filled flush to the top, you need approximately 3 inches of excavation depth—2 inches for the geocell plus 1 inch of base preparation beneath.
Check for consistent depth across the entire path. Remove any roots, rocks larger than your fist, or debris that could puncture the geotextile fabric.
If your path traverses a slope, consider adding a slight crown (1/4 inch per foot) at the center to encourage water to sheet off both sides rather than channeling down the middle.
Step 3: Compact the Subgrade
Use a hand tamper or plate compactor to firm up the native soil. This step is critical—a loose subgrade will still compress under the geocell, reducing the effectiveness of the system.
For clay soils that drain poorly, consider adding a 1-inch layer of coarse sand or crusher fines before laying geotextile. This creates a capillary break and improves drainage. The geocell installation manual provides additional guidance for challenging soil conditions.
Step 4: Install Geotextile Fabric
Roll out non-woven geotextile fabric across the entire excavated area, extending 6 inches beyond the path edges on all sides. Overlap seams by at least 12 inches if using multiple pieces.
The fabric serves two functions: it prevents native soil from mixing up into your gravel fill, and it provides a stable surface for the geocell to sit on. Skipping this step is the most common DIY mistake—and it leads to gravel disappearing into the subgrade within 1-2 seasons.
Step 5: Expand and Position the Geocell
BaseCore™ arrives compressed flat. Stretch the panel to its full expanded dimensions (each panel covers approximately 8 feet by 20 feet when fully opened, depending on cell depth).
Position the expanded geocell on top of the geotextile, aligning it with your path boundaries. For curved paths, the flexible cell structure bends naturally—simply shape it to follow your layout.
Trim edges with a utility knife or tin snips to fit your exact path width. Save trimmed sections; they can fill corners or patch tight spots.
Step 6: Secure the Geocell
Drive landscape stakes or J-pins through the geocell cell walls at 3-foot intervals along both edges of the path. This anchors the grid and prevents it from shifting during filling.
For paths longer than a single geocell panel, connect multiple panels using BaseClips or by overlapping cell edges. The How It Works guide shows proper panel connection techniques.
Step 7: Fill with Crushed Angular Gravel
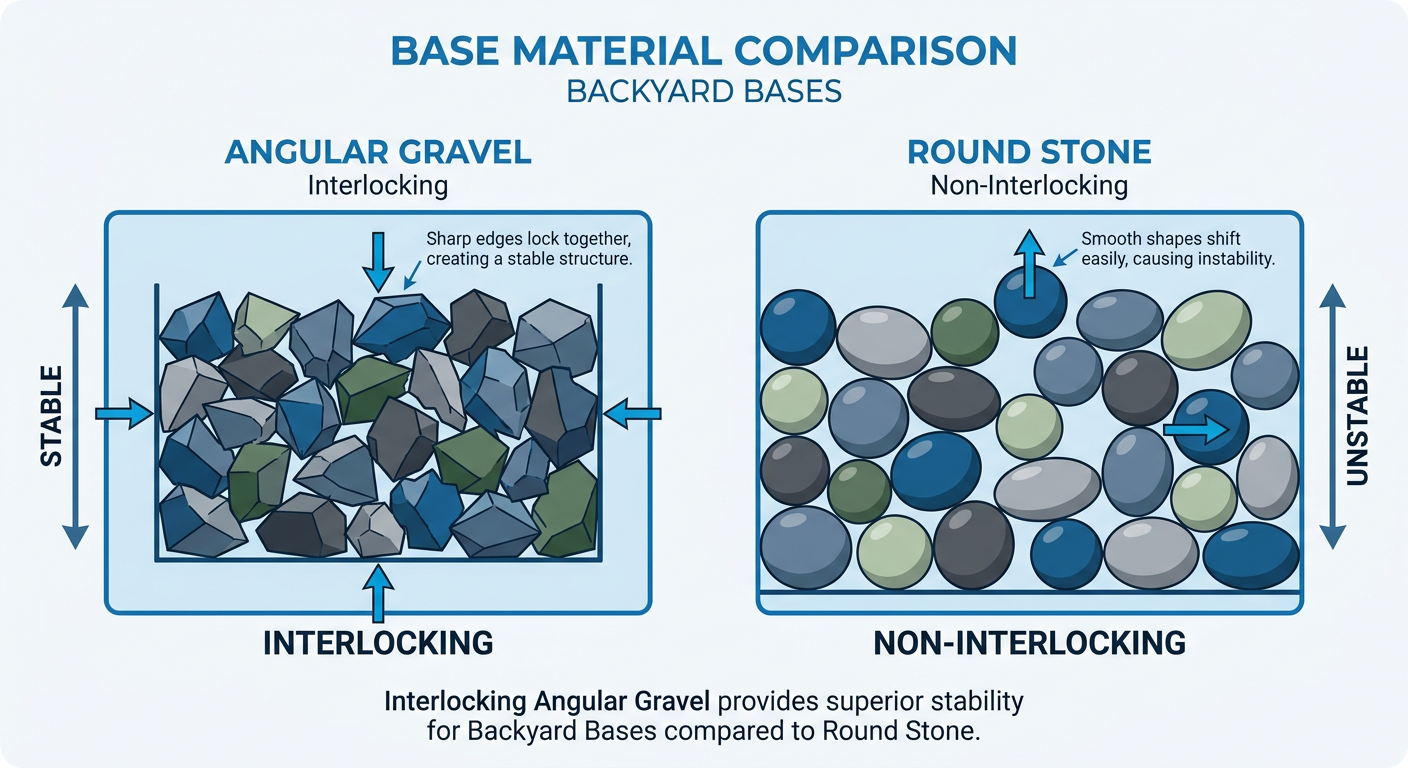
Use crushed stone—not river rock or pea gravel. Angular aggregate interlocks within the cells; round stones roll and shift regardless of the geocell structure. Recommended sizes range from 3/8-inch to 3/4-inch for pedestrian paths.
Shovel or wheelbarrow gravel into the cells, working in small sections. Fill cells slightly proud (1/4 inch above the cell tops) to account for settling.
The geocell vs gravel comparison guide explains why this crushed-stone-plus-confinement combination outperforms loose gravel in every application.
Step 8: Compact and Finish
Run a plate compactor over the filled geocell, or use a hand tamper for smaller paths. This seats the gravel firmly into the cells and locks everything in place.
After compaction, add additional gravel to top off any cells that settled below the surface. The finished path should be flush with the top of the geocell walls, with no exposed plastic visible.
Fold the excess geotextile fabric edges up and tuck them under the path perimeter, or trim flush if you’re installing steel edging. The steel landscape edging guide explains how BaseEdge HD creates a clean permanent border that prevents edge migration.
Common Mistakes to Avoid
- Using round gravel: Pea gravel and river rock lack the angular surfaces needed for interlocking. They’ll shift within the cells and feel unstable underfoot.
- Skipping geotextile: Without fabric separation, your gravel will migrate down into the subgrade within 1-2 years, reducing effective depth and stability.
- Under-compacting the subgrade: Soft spots underneath the geocell will still compress, creating dips and uneven sections.
- Overfilling cells: Gravel mounded above the cell walls has no confinement—it will spread just like an unstabilized path.
Which Geocell Depth Should You Use for Paths?
For pedestrian-only paths and garden walkways, 2-inch BaseCore™ provides sufficient load distribution and confinement. This depth handles foot traffic, wheelbarrows, and light garden equipment without issue.
If your path will see occasional heavier use—riding mowers crossing, hand trucks, or frequent wheelbarrow traffic with heavy loads—consider 3-inch BaseCore™ for additional stability.
The driveway application page explains when to step up to 4-inch or 6-inch depths for vehicle traffic, while paths and walkways typically stay in the 2-3 inch range.
How Long Does a Geocell Gravel Path Last?
Unlike loose gravel that requires annual top-ups and re-grading, a properly installed geocell path is essentially permanent. The HDPE material resists UV degradation, won’t rot or rust, and maintains its structure through freeze-thaw cycles.
Most homeowners report zero maintenance for 10+ years. If gravel does settle over time (typically 1/4 to 1/2 inch over several years), simply add a thin top-dressing and compact—no excavation or reinstallation required.
Browse the Backyard Bases gallery to see real installations from homeowners across the country, including paths, patios, and access routes that have been in service for years.
Is Geocell Path Stabilization Worth the Cost?
Compare the one-time investment against the ongoing expense of traditional loose gravel:
A typical unstabilized gravel path loses 20-30% of its material annually to migration and erosion. If you’re re-graveling even a small path every 1-2 years, you’re spending more on replacement aggregate than the geocell would have cost upfront—plus your time re-leveling and raking.
The geocell vs gravel cost comparison breaks down the math for driveways, but the same principle applies to paths: cellular confinement eliminates the replacement cycle entirely.
How does a gravel path with geocell compare to pavers or concrete?
Pavers and concrete cost 3-5 times more than geocell-stabilized gravel for the same square footage, require professional installation in most cases, and create impermeable surfaces that contribute to runoff and drainage problems.
Geocell paths remain fully permeable—water drains through instead of sheeting off. This makes them ideal for properties with drainage concerns or municipalities with stormwater regulations.
Concrete also cracks over time, especially in climates with freeze-thaw cycles. Geocell flexes with ground movement rather than fracturing, eliminating the crack repair and eventual replacement that concrete surfaces require.
Can I install geocell on a sloped path?
Yes—geocell actually performs better on slopes than loose gravel, which tends to wash downhill with every rain. The cell walls contain aggregate in place regardless of grade.
For slopes exceeding 10%, anchor the geocell with additional stakes and consider using slightly larger aggregate (3/4-inch) for better interlock. The geocell erosion control covers slope stabilization techniques in detail.
On steep grades (above 15-20%), consult with Backyard Bases at 888-897-2224 for site-specific recommendations—additional anchoring or stepped construction may be appropriate.
What type of gravel works best with geocell?
Crushed angular stone in 3/8-inch to 3/4-inch size provides optimal interlock within geocell applications. The irregular edges catch against each other and the cell walls, creating a stable matrix that resists shifting.
Avoid rounded aggregates like pea gravel, river rock, or tumbled stone—they lack the angular surfaces needed for mechanical interlock and will shift under foot traffic even within the cells.
Common crushed stone options include crushed granite, limestone screenings, and recycled concrete aggregate. Local availability varies; your aggregate supplier can recommend the best regional option that meets the angular-texture requirement.
Build a Gravel Path That Lasts
A gravel path should be a one-time project, not an annual maintenance chore. By addressing the three root causes of path failure—lateral migration, weak subgrade, and erosion—geocell cellular confinement transforms loose aggregate into a stable, permanent walking surface.
The entire installation takes a single weekend with basic tools, no concrete mixing, and no heavy equipment. And unlike poured surfaces, you can adjust the path layout or extend it later without demolition.
Order your BaseCore™ geocell kit at backyardbases.com/order-now or call 888-897-2224 for help sizing your path project.
Frequently Asked Questions
How deep should geocell be for a gravel walkway?
For pedestrian-only paths and garden walkways, 2-inch BaseCore™ geocell provides adequate load distribution and gravel confinement. Step up to 3-inch depth if your path will handle wheelbarrows with heavy loads or occasional equipment crossings.
How much gravel do I need to fill geocell on a path?
Calculate approximately 0.5 cubic yards of crushed stone per 10 square feet of path when using 2-inch geocell. The foundation calculator provides exact quantities based on your specific dimensions and chosen geocell depth.
Can I install geocell path stabilization myself without special tools?
Yes—geocell path installation requires only basic hand tools: shovel, rake, utility knife, tape measure, and a hand tamper or rented plate compactor. No concrete mixing, no heavy equipment, and no specialized construction skills needed.
Does geocell work in areas with heavy rain or poor drainage?
Geocell-stabilized gravel remains fully permeable, allowing rainwater to drain straight through the aggregate and into the ground. Combined with geotextile fabric underneath, the system handles heavy rain better than loose gravel by preventing erosion while maintaining drainage.
How long will a geocell gravel path last compared to loose gravel?
Properly installed geocell paths require essentially zero maintenance for 10+ years, while loose gravel paths typically need annual re-graveling and re-grading. The HDPE cellular structure resists UV, rot, and freeze-thaw cycles indefinitely.
This article is for informational purposes only. The guidance provided reflects Backyard Bases’ product documentation, published build guides, and general ground stabilization principles. Soil conditions, climate, drainage, and load requirements vary by property—consult Backyard Bases or a qualified contractor for site-specific recommendations. For current product information, sizing help, and pricing, visit backyardbases.com or call 888-897-2224.
