
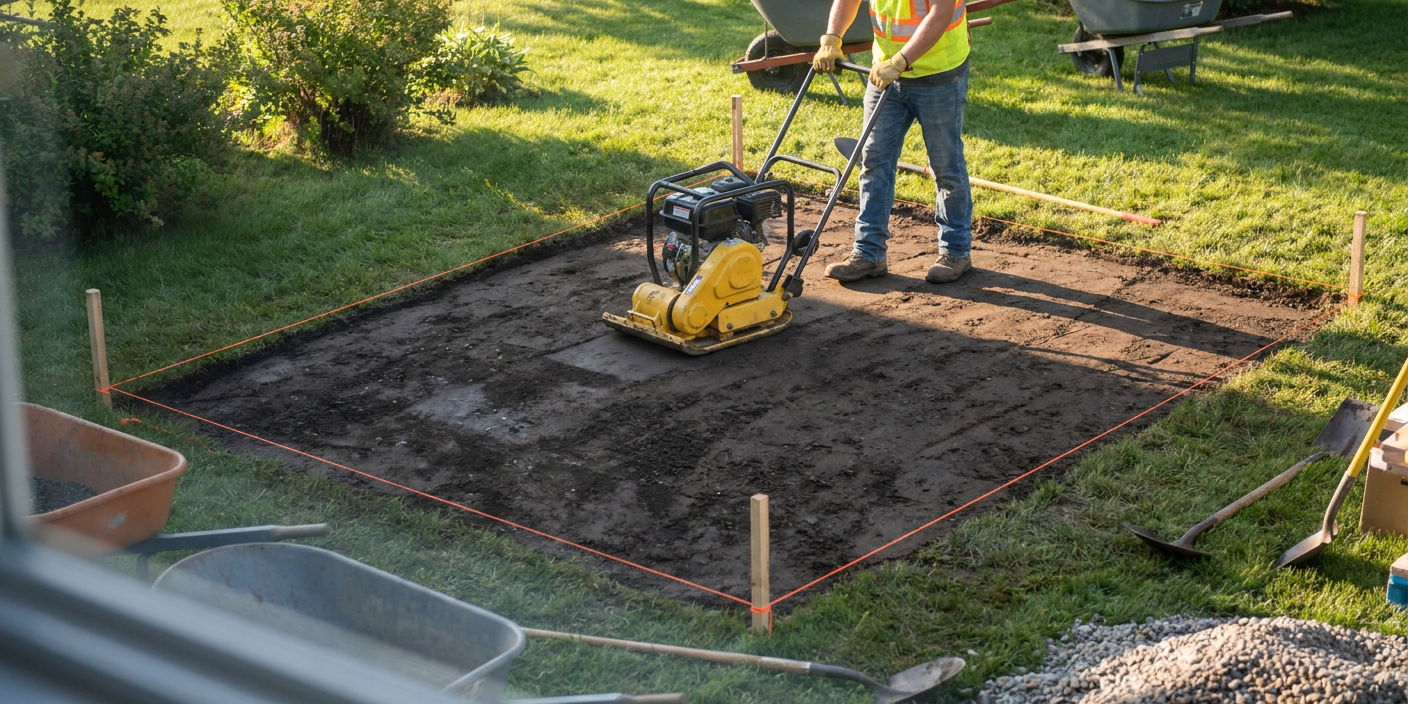
The average homeowner replaces a failed shed base or re-grades a rutted driveway every three to five years—spending hundreds of dollars and entire weekends on temporary fixes that sink, shift, or wash away. The root problem isn’t the gravel or the effort you put in. It’s the missing structural layer that keeps everything locked in place.
DIY ground grid installation solves this by creating a cellular confinement system that locks aggregate in place, distributes weight evenly across your subgrade, and allows water to drain through instead of pooling on top. A geocell foundation like BaseCore™ from Backyard Bases transforms loose gravel into a unified, load-bearing surface—no concrete, no heavy equipment, and no professional contractor required.
This guide walks you through the complete process: understanding why traditional loose-fill foundations fail, how geocell technology solves those problems, and the exact steps to install your own ground grid base in a single weekend. Whether you’re building a shed foundation, stabilizing a gravel driveway, or creating a solid base for a carport, the installation principles remain the same.
Why Traditional Loose-Fill Foundations Fail
Before you stake out your project area, you need to understand what causes backyard foundations to deteriorate. Every sinking shed, rutted driveway, and washed-out parking pad traces back to one or more of three engineering failures.
Weak or Saturated Subgrade
The native soil under your project is the starting point for every load-bearing calculation. Clay soils hold water and become unstable when saturated. Sandy soils drain well but compress unevenly under concentrated weight. Most backyards contain a mix of soil types that respond differently to moisture and load—creating uneven settling over time.
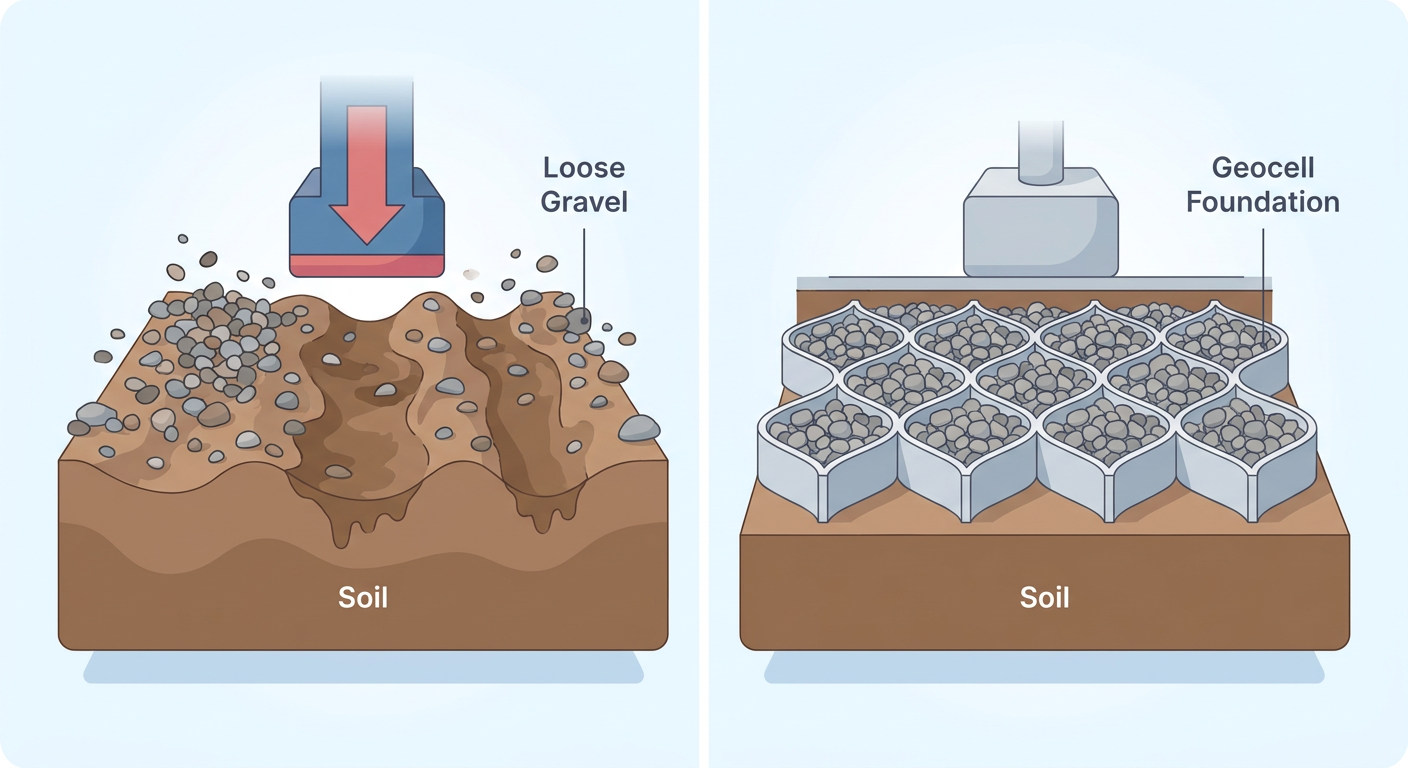
When you place loose gravel directly on unprepared soil, the aggregate slowly sinks into the subgrade. Heavy rain accelerates this process, turning your foundation into a mud-gravel mixture that can’t support weight consistently.
No Lateral Confinement
Loose gravel migrates sideways under pressure. Every time you drive across an unconfined gravel driveway, your tires push aggregate outward—creating ruts where your wheels track and berms along the edges. The same physics applies to any loaded surface: shed floors press down, aggregate spreads out, and your level foundation becomes uneven.
Adding more gravel only delays the problem. Without physical barriers holding the aggregate in a fixed position, lateral migration continues indefinitely. This is why homeowners find themselves ordering another dump truck of gravel every few years.
No Water Management
Surface water pooling on or under your foundation causes erosion, frost heave, and accelerated subgrade failure. Compacted gravel bases—especially those installed without proper drainage planning—trap water instead of directing it away from structures.
Concrete exacerbates this problem by creating impermeable surfaces that redirect water to your foundation’s edges, where it undermines stability. Permeable solutions that allow water to pass through while maintaining structural integrity solve driveway drainage problems that concrete creates.
How Geocell Ground Grids Create Permanent Stability
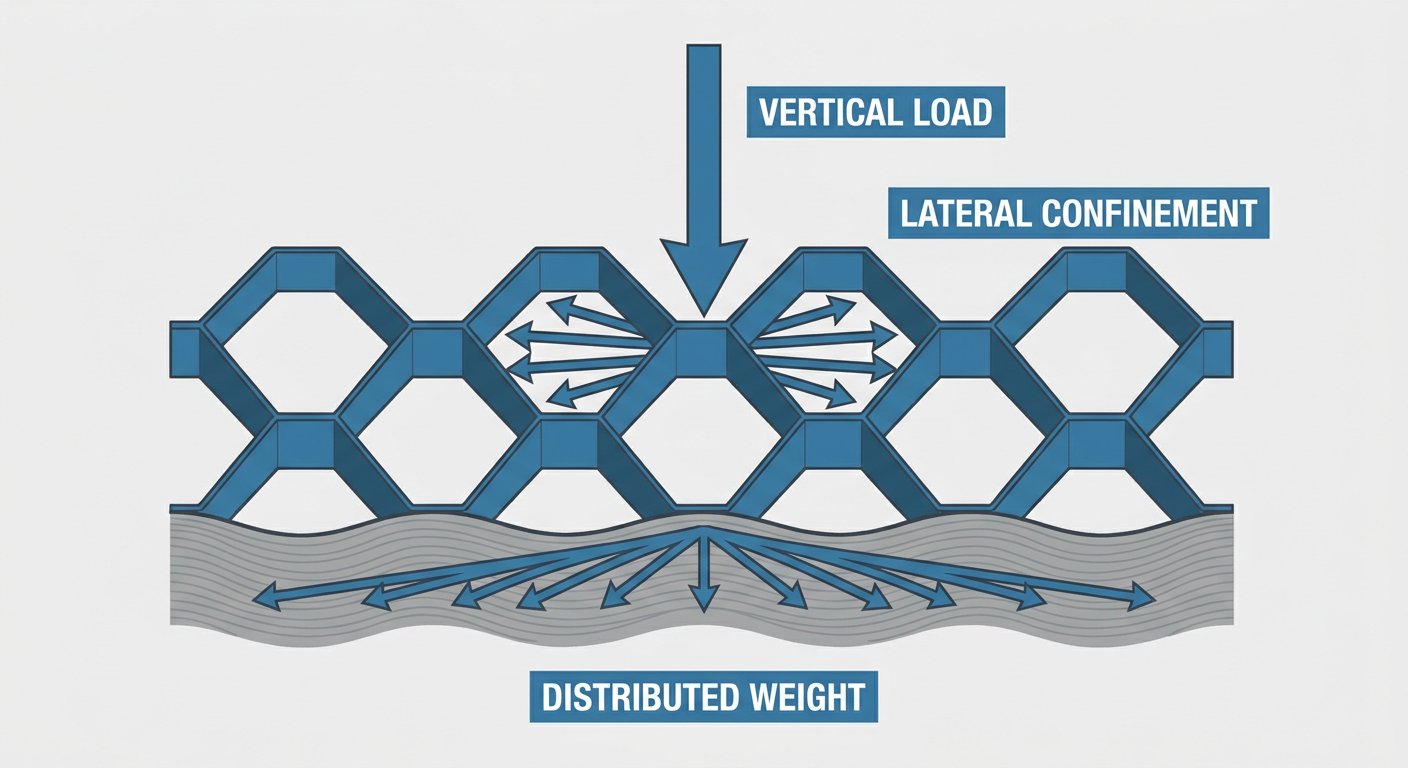
A geocell is a three-dimensional honeycomb structure made from connected cells that expand across your project area. When filled with aggregate, each cell becomes an individual confined unit that can’t spread into neighboring cells. The result is a unified load-bearing surface where pressure on any single point distributes across the entire grid.
Cellular Confinement Locks Aggregate in Place
BaseCore™ panels connect to form a continuous honeycomb pattern across your foundation area. Each cell wall acts as a physical barrier—when you load one cell, the aggregate pushes against the walls instead of spreading sideways. This eliminates the lateral migration that causes ruts, sinking, and uneven settling.
The engineering principle is straightforward: confined aggregate behaves like a solid surface rather than a loose collection of stones. Your gravel driveway stops developing tire tracks, your shed base maintains level support, and your parking pad handles repeated vehicle traffic without degradation.
Load Distribution Protects Your Subgrade
When weight presses down on a geocell-stabilized surface, the connected cells transfer that load horizontally across the entire grid. A vehicle tire pressing on a 6-inch contact patch effectively distributes its weight across several square feet of subgrade—reducing point pressure to a fraction of what loose gravel would transmit.
This load distribution protects weak subgrades from localized compression. Even clay soils that would fail under concentrated loads can support significant weight when that weight spreads across a larger area. For heavier applications, BaseCore HD™ panels provide additional structural capacity for vehicle traffic and equipment storage.
Drainage Without Erosion
Unlike concrete or compacted base materials, geocell foundations remain fully permeable. Water passes through the gravel fill, through the cell walls, and into the subgrade below. This permeability prevents surface pooling while maintaining the structural integrity that loose gravel lacks.
The cell walls prevent erosion during drainage events. Water can move through your foundation, but the aggregate stays locked in position—eliminating the washout patterns that plague unconfined gravel surfaces during heavy rain.
Ready to build a foundation that won’t sink, shift, or wash away? Browse BaseCore™ geocell kits at backyardbases.com/order-now or call 888-897-2224 for help sizing your project.
Step-by-Step DIY Ground Grid Installation
Installing a geocell ground grid is a straightforward process that most homeowners complete in a single weekend. The following steps apply to shed bases, parking pads, driveway sections, and most other backyard foundation projects. Your foundation calculator will help determine material quantities based on your specific dimensions.
Tools and Materials You’ll Need
- BaseCore™ or BaseCore HD™ geocell panels (quantity based on square footage)
- Geotextile fabric (extends 6 inches beyond grid on all sides)
- Steel landscape edging for permanent borders
- Crushed gravel or aggregate (typically 3/4-inch minus)
- Landscape stakes or pins
- Tape measure and string line
- Shovel and rake
- Plate compactor (rental) or hand tamper for smaller areas
- Utility knife for trimming cells to fit
- Work gloves and safety glasses
Step 1: Prepare Your Site
Mark your foundation boundaries with stakes and string, adding 6 inches on each side for edging and fabric overlap. Remove all vegetation, roots, and organic material from the project area—organic matter decomposes and creates voids under your foundation.
Excavate to a depth that accommodates your geocell height plus 1-2 inches of base material. For a 3-inch BaseCore™ installation, excavate 4-5 inches total. Grade the excavated area with a slight slope (1-2% or about 1/8 inch per foot) directing water away from any adjacent structures.
Compact the exposed subgrade using a plate compactor or hand tamper. Soft spots should be addressed now—either by additional compaction or by removing and replacing poor soil with compacted base material.
Step 2: Install Geotextile Fabric
Roll out geotextile fabric across the entire excavated area, extending 6 inches beyond your grid footprint on all sides. This separation layer prevents subgrade soil from migrating up into your aggregate fill and stops fine particles from clogging drainage paths.
Overlap fabric seams by 12 inches if multiple rolls are needed. Secure the fabric with landscape staples every 2-3 feet along edges and seams to prevent shifting during grid installation. The fabric should lie flat without wrinkles or bunches.
Step 3: Position and Expand Geocell Panels
BaseCore™ panels ship in a compressed format that expands into the honeycomb pattern on site. Position your first panel at one corner of the prepared area. Secure one edge with stakes, then walk the panel open while a helper stakes the opposite edge.
Connect subsequent panels using the built-in connection points—cells along adjoining edges interlock to form a continuous grid. Trim edge cells with a utility knife to fit your exact dimensions. Each panel covers approximately 64 square feet when fully expanded.
For projects requiring multiple rows, stagger panel seams like brickwork for improved structural continuity. The geocell installation manual provides detailed connection guidance for complex layouts.
Step 4: Install Edge Restraint
Before filling with aggregate, install steel landscape edging along all exposed borders. Edge restraint prevents the outermost cells from spreading and maintains clean, defined boundaries for your finished surface.
Drive edging stakes through the geotextile fabric into the compacted subgrade at 3-4 foot intervals. The edging should sit flush with or slightly above the top of your geocell panels—you’ll backfill against it during the aggregate phase.
Step 5: Fill Cells with Aggregate
Wheelbarrow or shovel 3/4-inch minus crushed gravel into the expanded cells, working in sections. Fill cells to slightly above the cell walls—aggregate will compact down during the finishing process. Avoid rounded river rock or pea gravel, which doesn’t interlock as effectively as angular crushed stone.
Rake aggregate level across sections as you work, ensuring complete fill with no voids or low spots. Total gravel depth should match your cell height: 2-inch cells need 2 inches of fill, 3-inch cells need 3 inches, and so on. Your gravel quantity calculations should account for slight overfill before compaction.
Step 6: Compact and Finish
Run a plate compactor across the entire filled surface in overlapping passes. Compaction settles aggregate into cells, eliminates voids, and creates a firm, unified surface. Add additional gravel to any low spots that appear during compaction and make a final pass.
For shed bases and light-duty applications, the finished surface is ready for immediate use. For driveways and vehicle traffic areas, allowing 24-48 hours for the aggregate to settle before heavy use improves long-term performance. Check the project gallery to see completed installations using these same techniques.
Common Installation Mistakes to Avoid
Skipping subgrade compaction: Soft spots under your grid will eventually telegraph through as uneven settling, regardless of how well you install the geocell layer.
Using rounded aggregate: River rock and pea gravel roll instead of interlocking. Crushed angular stone creates the mechanical bond that makes cellular confinement effective.
Omitting geotextile fabric: Without separation, subgrade soil migrates into your aggregate over time, reducing drainage and compromising structural integrity.
Under-filling cells: Aggregate that sits below cell wall height doesn’t benefit from lateral confinement. Fill to or slightly above the top of each cell.
Which Geocell Depth Do You Need?
Selecting the right cell depth depends on your application, expected loads, and subgrade conditions. Backyard Bases offers multiple depth options to match project requirements without over-building or under-engineering your foundation.
2-inch depth: Ideal for pedestrian traffic, garden pathways, and light-duty applications where vehicle loads aren’t expected. Also suitable as a permeable paver base under decorative surfaces.
3-inch depth: The most versatile option for residential projects. Handles shed foundations, gazebo bases, hot tub pads, and occasional vehicle traffic on stable subgrades.
4-inch depth: Recommended for regular vehicle traffic including residential driveways, RV parking pads, and carport foundations. Provides additional load distribution for heavier applications.
6-inch depth: Heavy-duty applications including farm equipment areas, commercial parking lots, and sites with challenging subgrade conditions that need maximum load distribution.
How Long Does DIY Ground Grid Installation Take?
Most residential geocell foundation projects complete in a single weekend. A 10×12-foot shed base typically takes 4-6 hours from site prep to finished surface for a homeowner working alone, or 2-3 hours with a helper. Larger projects like driveways or parking areas scale proportionally—expect a full day for most driveway installations.
The most time-consuming phase is usually site preparation and excavation. If your project area is relatively flat with good soil conditions, preparation time decreases significantly. Projects requiring substantial grading or soil removal may benefit from renting a skid steer for the initial excavation, then completing geocell installation manually.
Can You Install Ground Grid on a Slope?
Yes—geocell ground grids actually excel on slopes where loose gravel would wash away immediately. The cellular confinement locks aggregate in place against gravity, making geocell systems a primary choice for erosion control on slopes up to moderate grades.
For sloped installations, anchor the uphill edge of your grid securely and work downhill during expansion. Additional staking along cell rows prevents downward creep during the filling process. Slopes exceeding 1:3 (roughly 33%) may require professional engineering assessment to ensure long-term stability.
Do Ground Grids Work in All Soil Types?
Geocell foundations perform effectively across soil types that would challenge or defeat traditional loose-fill approaches. Clay soils benefit from the load distribution that prevents localized compression. Sandy soils benefit from the lateral confinement that prevents aggregate migration. The cellular confinement system addresses the specific failure modes of each soil type.
Extremely poor subgrades—saturated clay, organic soils, or areas with high water tables—may require additional preparation such as French drains, deeper excavation with imported fill, or professional soil assessment. When in doubt, contact Backyard Bases for guidance on challenging site conditions.
Conclusion
DIY ground grid installation eliminates the cycle of sinking, shifting, and re-grading that plagues traditional loose-fill foundations. By confining aggregate in a cellular structure, you transform gravel into a unified load-bearing surface that handles traffic, sheds water, and maintains level support for decades—all without pouring concrete or hiring a contractor.
Whether you’re building a shed foundation, stabilizing a driveway, or creating a permanent parking pad, the installation process follows the same principles: prepare your subgrade, lay geotextile fabric, expand and connect your geocell panels, install edge restraint, fill with angular aggregate, and compact to a finished surface.
Start your project today. Order BaseCore™ geocell kits at backyardbases.com/order-now or call 888-897-2224 for sizing help and material calculations.
Frequently Asked Questions
How much gravel do I need for a geocell foundation?
Calculate gravel volume by multiplying your project’s square footage by the cell depth in feet. A 100-square-foot area with 3-inch cells needs approximately 25 cubic feet or about 1 ton of crushed gravel, including slight overfill for compaction. The foundation calculator provides exact quantities for your dimensions.
Can I install BaseCore geocells over existing gravel?
Yes, if the existing gravel base is stable, level, and well-compacted. Remove any loose or contaminated material, compact the surface, lay geotextile fabric, then install your geocell panels directly on top. This approach works well for upgrading existing gravel driveways without full excavation.
What’s the difference between BaseCore and BaseCore HD?
BaseCore HD™ uses thicker cell walls and heavier-duty construction for applications involving regular vehicle traffic, heavy equipment, or challenging subgrade conditions. Standard BaseCore™ handles sheds, gazebos, and light-duty pedestrian applications at a lower material cost.
How long will a geocell foundation last?
BaseCore™ geocells are manufactured from UV-stabilized HDPE that resists degradation from sunlight, moisture, and temperature cycling. Under normal residential use, a properly installed geocell foundation performs for 20+ years without the periodic re-grading or material replenishment that loose gravel requires.
Do I need a permit for a ground grid foundation?
Permit requirements vary by jurisdiction and project type. Most areas don’t require permits for accessory structure foundations like sheds or parking pads, but driveways connecting to public roads may need approval. Check with your local building department before starting—geocell foundations typically meet or exceed code requirements for the applications they serve.
This article is for informational purposes only. The guidance provided reflects Backyard Bases’ product documentation, published build guides, and general ground stabilization principles. Soil conditions, climate, drainage, and load requirements vary by property—consult Backyard Bases or a qualified contractor for site-specific recommendations. For current product information, sizing help, and pricing, visit backyardbases.com or call 888-897-2224.
