

The average homeowner replaces a failing shed foundation or re-grades a rutted gravel driveway every three to five years—spending hundreds of dollars and entire weekends on temporary fixes that wash out after the next heavy rain. The root problem isn’t the gravel or the structure above it. It’s what’s happening underneath.
Geocell foundation kits solve the three core causes of outdoor project failure—weak subgrade, lateral aggregate migration, and poor drainage—by locking fill material into a rigid honeycomb grid that distributes load evenly and allows water to drain through. Unlike poured concrete or loose gravel alone, a geocell system creates a stable, permeable base you can install yourself in a single weekend without heavy equipment. Backyard Bases’ geocell ground grid guide explains the engineering principles behind this approach.
This guide covers why traditional foundations fail, how geocell technology addresses each failure point, and the exact steps to build a lasting base for sheds, driveways, carports, hot tub pads, and other backyard projects.
Why Traditional Outdoor Foundations Fail
Before you can fix a foundation problem, you need to understand what’s actually going wrong. Most DIY foundation failures trace back to three engineering root causes—and most homeowners unknowingly ignore all three.
Weak or Saturated Subgrade
Your native soil is the true foundation of any outdoor project. Clay soils expand when wet and shrink when dry, creating uneven movement that shifts structures above. Sandy soils drain well but compress unevenly under load. Organic-rich topsoil decomposes over time, creating voids.
What it looks like: A shed that leans to one side after a rainy season. A hot tub pad that develops a visible dip in one corner. Driveway ruts that appear in the same spots every spring.
Why the typical fix fails: Adding more gravel on top of weak soil just gives you a thicker layer of material sitting on an unstable base. The problem is the subgrade, not the surface.
No Lateral Confinement
Loose aggregate—gravel, crushed stone, decomposed granite—migrates sideways under load. Every time a vehicle drives across your driveway or you walk across your shed pad, the stones shift outward. Over months, you get bare spots, ruts, and edges that creep into your lawn.
What it looks like: Gravel that “disappears” from high-traffic areas. Tire tracks that grow deeper each month. A leaning shed where the base material has pushed out from under one side.
Why the typical fix fails: Raking gravel back into place treats the symptom, not the cause. Without something holding the aggregate in position, it will migrate again immediately.
No Water Management
Water finds the path of least resistance. On an impermeable surface like concrete, that means pooling, runoff erosion at the edges, and freeze-thaw cracking in cold climates. On loose gravel without proper drainage, water saturates the subgrade and washes fines away, leaving voids.
What it looks like: Standing water on your driveway after rain. Erosion channels cutting through your gravel. Cracking concrete from frost heave.
Why the typical fix fails: Pouring concrete creates more impermeable surface area, which concentrates runoff at the edges and increases erosion elsewhere. Adding more gravel without addressing drainage just raises the surface temporarily.
How Geocell Foundation Kits Solve These Problems
A geocell is a three-dimensional honeycomb grid made from connected cells—typically high-density polyethylene (HDPE)—that expand into a rigid panel when deployed. You fill the cells with aggregate, and the cell walls prevent that aggregate from moving sideways. The result is a stable, load-bearing surface that drains freely.
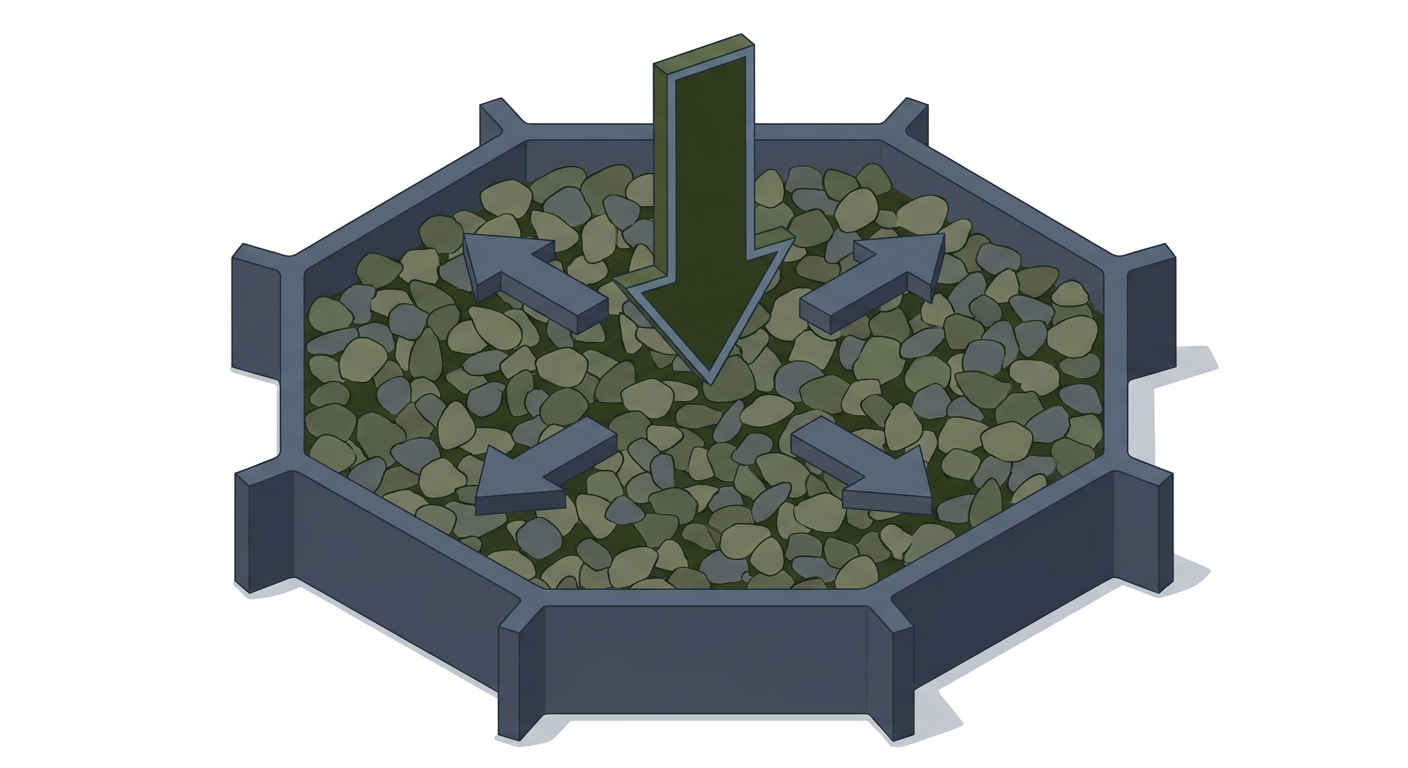
Geocells transform vertical pressure into lateral stability by confining aggregate within rigid walls.
BaseCore™ and BaseCore HD™ geocell foundation kits from Backyard Bases apply this technology specifically for DIY backyard projects. Here’s how they address each root cause:
Bridging Weak Subgrade
The interconnected cell structure distributes weight across a wider area than loose gravel can. When you place a shed on a geocell foundation, the load spreads laterally through the cell walls rather than concentrating directly under the support points. This reduces point-loading on weak soil and minimizes differential settlement.
Combined with geotextile fabric underneath, the system also prevents fine soil particles from migrating up into the aggregate and weakening the base over time—a process engineers call subgrade contamination.
Providing Lateral Confinement
This is the core engineering principle behind cellular confinement technology. Each cell acts like a tiny retaining wall. When a vehicle tire or foot traffic presses down on the gravel, the aggregate can’t push sideways because the cell walls contain it. The confined aggregate becomes effectively “locked” in place, creating a semi-rigid surface from flexible materials.
According to research from the Federal Highway Administration, cellular confinement systems can increase the effective bearing capacity of granular bases by distributing vertical loads laterally through the cell walls.
Enabling Drainage
Unlike concrete, a geocell foundation is inherently permeable. Water flows down through the gravel fill, through the open cell bottoms, through the geotextile fabric, and into the subgrade. There’s no pooling, no concentrated runoff, and no hydrostatic pressure building up under your structure.
This permeability also means geocell foundations handle freeze-thaw cycles better than solid slabs. Water doesn’t get trapped to expand when it freezes, so you avoid the cracking and heaving that destroys concrete in cold climates.
Ready to build a foundation that actually lasts? Explore BaseCore geocell foundation kits sized for your specific project, or call 888-897-2224 for help choosing the right depth and quantity.
Choosing the Right Geocell Depth for Your Project
Not every project needs the same foundation. Geocell depth determines load-bearing capacity, and Backyard Bases offers multiple options to match different applications:
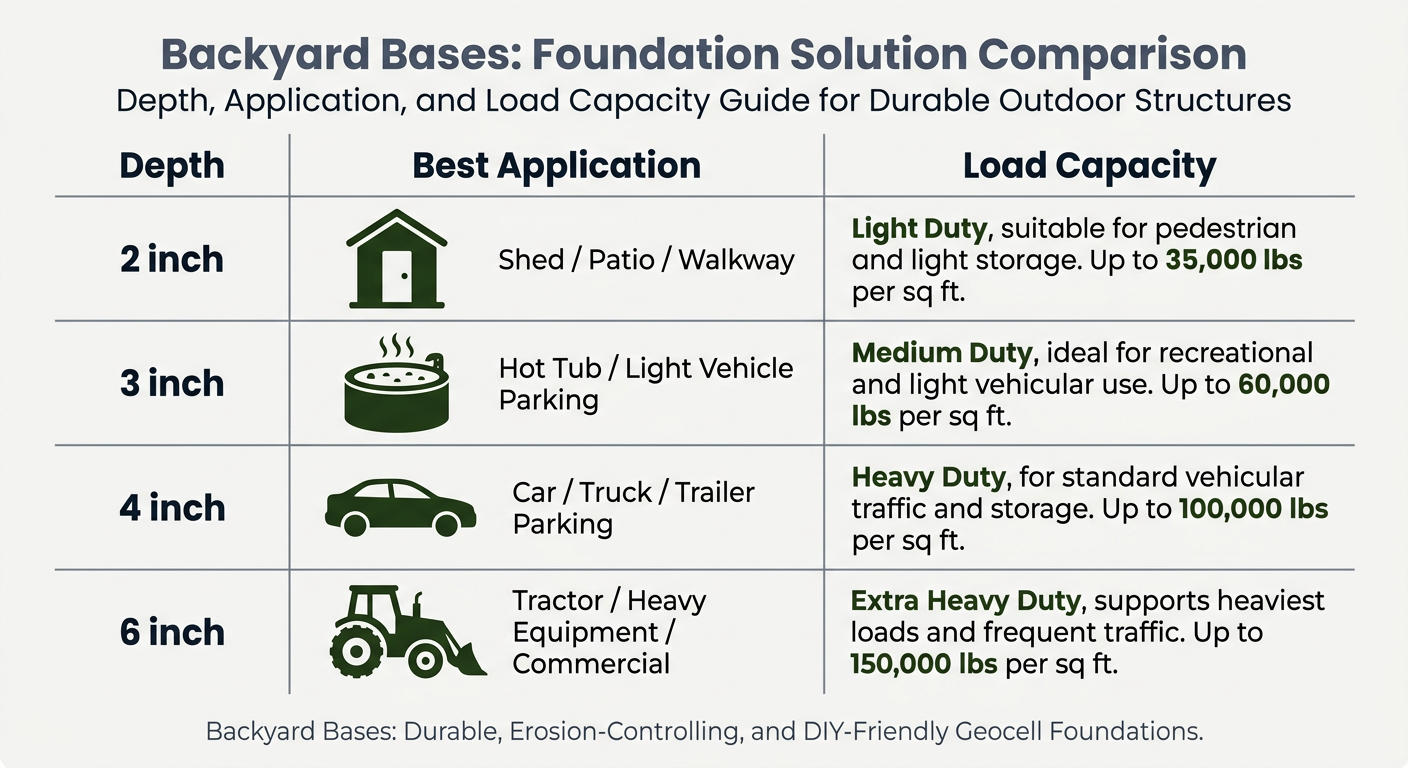
Choosing the correct geocell depth ensures long-term stability for your specific project load.
The BaseCore HD™ line uses thicker cell walls and higher-grade HDPE for applications with heavier loads or more aggressive traffic patterns. For a typical backyard shed on stable soil, standard BaseCore™ in 2-inch depth provides more than enough support. For a gravel driveway with daily vehicle traffic, BaseCore HD™ in 3-inch or 4-inch depth handles the load demands.
Use the foundation calculator to determine how many panels and how much gravel you’ll need for your specific project dimensions.
Step-by-Step: Installing a Geocell Foundation Kit
One of the biggest advantages of geocell foundation kits is DIY accessibility. You don’t need a concrete truck, forms, rebar, or curing time. Most residential projects take one to two days with basic tools.
Tools and Materials You’ll Need
- BaseCore™ or BaseCore HD™ geocell panels (quantity based on project size)
- Geotextile fabric (to cover the excavated area plus 6-inch overlap on edges)
- Crushed stone or angular gravel (typically 3/4-inch minus or similar)
- Steel landscape edging (optional but recommended for clean borders)
- Shovel, rake, and wheelbarrow
- Plate compactor (rent from a local equipment store)
- Utility knife or heavy scissors (for trimming geocell to fit)
- Measuring tape and stakes
- String line for layout
Step 1: Mark and Excavate the Area
Outline your project footprint with stakes and string. For most applications, excavate 4 to 6 inches deep—enough to accommodate the geocell height plus 1 to 2 inches of base gravel beneath and fill above. Remove all organic material, roots, and large rocks.
If your subgrade is particularly soft or clay-heavy, consider excavating an additional 2 inches and adding a compacted base layer of crushed stone before laying the geotextile.
Step 2: Compact the Subgrade
Use a plate compactor to firm up the exposed soil. This step is critical—even the best geocell system can’t compensate for a subgrade that compresses unevenly. Make two or three passes until the surface feels solid underfoot.
Step 3: Install Geotextile Fabric
Roll out geotextile fabric across the entire excavated area, overlapping seams by at least 6 inches. The fabric serves two purposes: it prevents fine soil particles from migrating up into your aggregate base, and it adds a separation layer that helps distribute load more evenly.
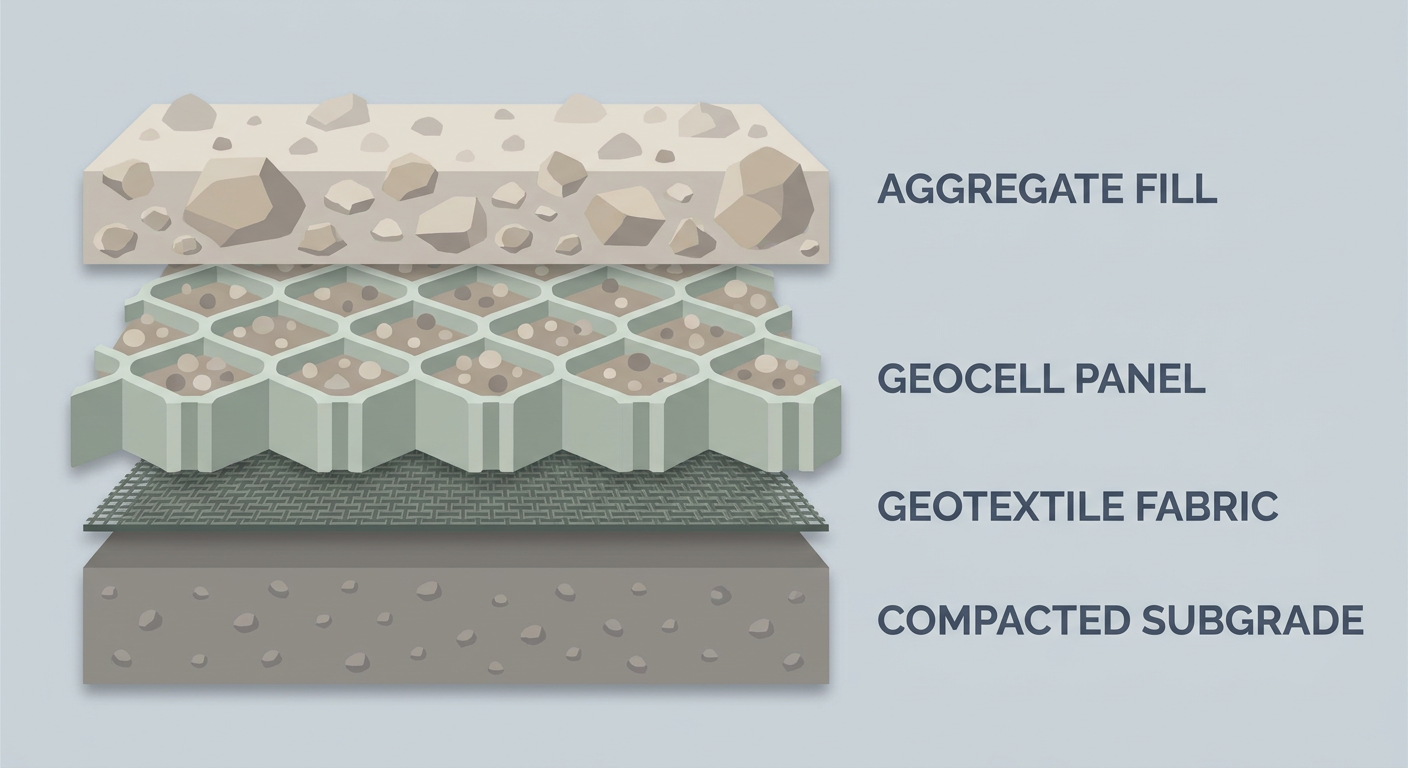
A proper installation layers geotextile fabric, geocell panels, and compacted aggregate for maximum durability.
Extend the fabric 6 to 12 inches beyond the project perimeter. You’ll fold this up against the geocell edges later or trim it after installation.
Step 4: Expand and Position the Geocell Panels
BaseCore™ geocell panels arrive collapsed for shipping. Stretch each panel to its full expanded size and stake the corners temporarily to hold the shape. Position panels according to your layout, connecting adjacent panels with the included clips.
For irregular shapes, use a utility knife to trim cells as needed. The geocell installation manual includes detailed guidance on cutting and connecting panels for custom configurations.
Step 5: Fill Cells with Aggregate
Pour crushed stone or angular gravel into the cells, working section by section. Fill to approximately 1 inch above the cell tops to allow for compaction. Angular aggregate (crushed stone, limestone, granite) locks together better than rounded river rock—the irregular edges interlock within the cells for maximum stability.
According to guidelines from the USDA Natural Resources Conservation Service, well-graded crushed stone with a mix of particle sizes compacts more densely than single-sized aggregate.
Step 6: Compact the Fill
Run a plate compactor over the filled geocell in overlapping passes. The aggregate will settle into the cells and lock into place. Add more gravel to any low spots and compact again until the surface is even and firm.
Step 7: Install Edging (Optional but Recommended)
Steel landscape edging creates a clean border that prevents edge migration and keeps your project footprint defined. Position the edging along the perimeter, stake it into the subgrade, and trim any excess geotextile fabric.
Step 8: Final Grading and Inspection
Check for any low spots or uneven areas. Add gravel and compact as needed. For driveway applications, ensure proper slope (1 to 2 percent grade) for drainage away from structures.
Total time for a typical 10×12 foot shed pad: 4 to 6 hours with one or two people. A 200-square-foot driveway section: one full weekend day.
What Size Should I Use for a Shed Foundation?
For a standard backyard shed under 200 square feet, BaseCore™ in 2-inch depth provides adequate support. The typical installation uses one panel per approximately 8 square feet of coverage, so a 10×12 shed pad requires 15 to 20 panels depending on the specific product dimensions.
Larger sheds, sheds storing heavy equipment, or sheds on soft soil benefit from 3-inch depth geocells. The best shed base guide compares geocell foundations to alternatives like concrete blocks, gravel alone, and paver bases.
Can I Use Geocell for a Gravel Driveway?
Yes—and a geocell foundation dramatically extends the lifespan of a gravel driveway by preventing the ruts, potholes, and aggregate migration that plague loose gravel surfaces. For driveways with regular vehicle traffic, use BaseCore HD™ in 3-inch or 4-inch depth.
The cellular confinement keeps gravel in place under tire loads, eliminates the need for frequent re-grading, and reduces long-term maintenance costs. The complete gravel driveway guide walks through the process from site prep to final compaction.
How Long Do Geocell Foundations Last?
HDPE geocells are engineered for long-term ground contact applications. The material resists UV degradation (once covered with fill), chemical exposure, and biological breakdown. With proper installation and drainage, a geocell foundation should outlast the structure above it—typically 25 years or more in residential applications.
The ASTM D5199 standard provides testing protocols for geosynthetic thickness measurement, and quality geocell products are manufactured to meet these durability benchmarks.
Compare that to a gravel-only base that needs re-grading every year or two, or a concrete slab that may crack and require replacement within a decade in freeze-thaw climates.
Geocell vs. Concrete: When to Choose Each
Concrete remains the right choice for some applications—permanent building foundations with specific load requirements, areas where local codes mandate concrete, or projects where a perfectly smooth, hard surface is essential.
Geocell foundations outperform concrete for:
- DIY installation: No forms, no mixing, no curing time, no heavy equipment
- Permeability: Water drains through rather than pooling or running off
- Freeze-thaw performance: No cracking from trapped moisture expansion
- Flexibility: Adapts to minor ground movement without cracking
- Removability: Can be disassembled and relocated if needed
- Environmental impact: Permeable surface reduces stormwater runoff
The geocell vs. geogrid comparison explains how cellular confinement differs from flat grid reinforcement products.
Common Mistakes to Avoid
Even a well-designed geocell system can underperform if installed incorrectly. Watch for these common DIY pitfalls:
Skipping the geotextile fabric: Without a separation layer, fine soil particles migrate into your aggregate base over time, reducing drainage and stability. Always use fabric.
Using rounded gravel: River rock and pea gravel roll within the cells instead of locking together. Use angular crushed stone for maximum interlock.
Under-compacting the subgrade: A soft subgrade will settle unevenly regardless of what you put on top. Take time to compact before laying fabric.
Insufficient fill depth: Filling cells only to the top leaves aggregate vulnerable to displacement. Fill 1 inch above cell tops before compacting.
Ignoring drainage slope: Even permeable surfaces need positive grade to direct water away from structures. Maintain 1 to 2 percent slope toward your drainage area.
The project gallery shows completed installations that demonstrate proper technique and finished results.
Beyond the Basics: Other Geocell Applications
While sheds and driveways are the most common DIY applications, geocell foundation kits work for nearly any outdoor project where you need a stable, level, well-drained surface:
- Hot tub pads that handle concentrated weight without settling
- Carport foundations that support vehicle and structure loads
- RV and camper pads for seasonal or permanent parking
- Erosion control on slopes and drainage channels
- Farm mud management in high-traffic areas around barns and gates
- Grass-paved surfaces where you want vegetation to grow through the grid
The same engineering principles—load distribution, lateral confinement, and drainage—apply across all these applications. The variable is geocell depth, which scales with expected load.
Conclusion
Most outdoor foundation failures come down to three fixable problems: weak subgrade, unconfined aggregate, and poor drainage. Geocell foundation kits address all three with a single system you can install yourself in a weekend—no concrete, no heavy equipment, no contractor fees.
Whether you’re building a shed base, stabilizing a gravel driveway, or creating a level pad for a hot tub, the approach is the same: excavate, compact, lay fabric, expand the geocell, fill with angular aggregate, and compact again.
Ready to start your project? Order your BaseCore™ geocell kit or call Backyard Bases at 888-897-2224 for help sizing your foundation.
Frequently Asked Questions
How much gravel do I need to fill geocell panels?
Plan for approximately 0.5 to 0.75 cubic feet of aggregate per square foot of geocell coverage, depending on cell depth. A 2-inch deep geocell uses less fill than a 4-inch deep panel. The foundation calculator provides specific quantities for your project dimensions.
Can I install geocell foundation kits on a slope?
Yes—geocells are commonly used for slope stabilization and erosion control. For slopes exceeding 10 percent grade, stake the geocell panels into the subgrade and consider using geotextile fabric anchored at the top of the slope.
Do I need to remove grass before installing geocell?
Yes. Remove all vegetation and organic topsoil from the project area before installation. Organic material decomposes over time, creating voids that cause settling. Excavate to mineral soil for best results.
What’s the difference between BaseCore and BaseCore HD?
BaseCore™ uses standard HDPE cell walls suitable for pedestrian traffic and light loads like shed foundations. BaseCore HD™ uses thicker walls and heavier-grade material for vehicle traffic and commercial applications where load demands are higher.
Can geocell foundations be used under pavers?
Yes—geocell creates an excellent permeable base for paver installations. The cellular confinement prevents the base layer from shifting, which reduces paver movement and joint separation over time.
This article is for informational purposes only. The guidance provided reflects Backyard Bases’ product documentation, published build guides, and general ground stabilization principles. Soil conditions, climate, drainage, and load requirements vary by property—consult Backyard Bases or a qualified contractor for site-specific recommendations. For current product information, sizing help, and pricing, visit backyardbases.com or call 888-897-2224.
