

Every heavy rainstorm costs U.S. homeowners billions in property damage—and much of that damage starts with erosion. Gullies cut through driveways. Slopes wash out overnight. Gravel migrates downhill and leaves bare, muddy patches where your yard used to be. The frustrating part? Most erosion damage is entirely preventable with the right ground stabilization system.
Geocell ground grids provide DIY storm erosion control by locking aggregate into a honeycomb cellular structure that resists water flow, distributes surface runoff, and keeps soil and gravel anchored in place—even during heavy rainfall. Unlike loose gravel or fabric-only solutions, BaseCore™ geocells create a unified, load-bearing surface that handles both foot traffic and stormwater without shifting or washing away. This article covers how storm erosion happens, why traditional fixes fail, and exactly how to install a geocell system that protects your property for years.
Why Storm Erosion Destroys Gravel Driveways, Slopes, and Yards
Storm erosion doesn’t happen randomly. When you understand the mechanics, the damage becomes predictable—and preventable.
The Three Forces Behind Storm Erosion
Sheet erosion occurs when rainwater flows across a surface as a thin, uniform layer. It strips away the top layer of soil or gravel gradually, so you don’t notice until suddenly your driveway is two inches lower than it was last year. This is the silent killer of gravel driveways on even gentle slopes.
Rill erosion happens when that sheet flow concentrates into small channels. Water finds the path of least resistance, and once a tiny channel forms, it deepens with every storm. Those finger-width channels across your yard or driveway will become six-inch-deep gullies within a season if left unaddressed.
Gully erosion is rill erosion that has grown out of control. At this stage, you’re looking at significant soil loss, potential structural damage to adjacent structures, and repair costs measured in thousands rather than hundreds.
What Makes Your Property Vulnerable
The USDA Natural Resources Conservation Service identifies slope, soil type, and vegetative cover as the primary factors determining erosion risk. Remove the vegetation for a driveway or shed pad, add any amount of slope, and you’ve created ideal conditions for erosion.
Loose gravel makes this worse, not better. Without lateral confinement, aggregate migrates downhill under water pressure. The gravel you spread in April collects at the bottom of your slope by August. Clay soils compact and become impermeable when wet, increasing runoff volume. Sandy soils wash away entirely.
Why Re-Grading and Adding More Gravel Fails
The typical homeowner response to erosion is to re-grade the area and add fresh gravel. This addresses none of the underlying causes. Without something to lock the aggregate in place, the new gravel will migrate exactly like the old gravel did. Without drainage management, water will continue finding and exploiting weak points. You’ve spent money and effort to reset the clock—not solve the problem.
How Geocell Ground Grids Stop Erosion at the Source
Geocell technology addresses all three root causes of storm erosion simultaneously. Understanding why it works helps you apply it correctly to your specific property challenges.
Cellular Confinement: Locking Aggregate in Place
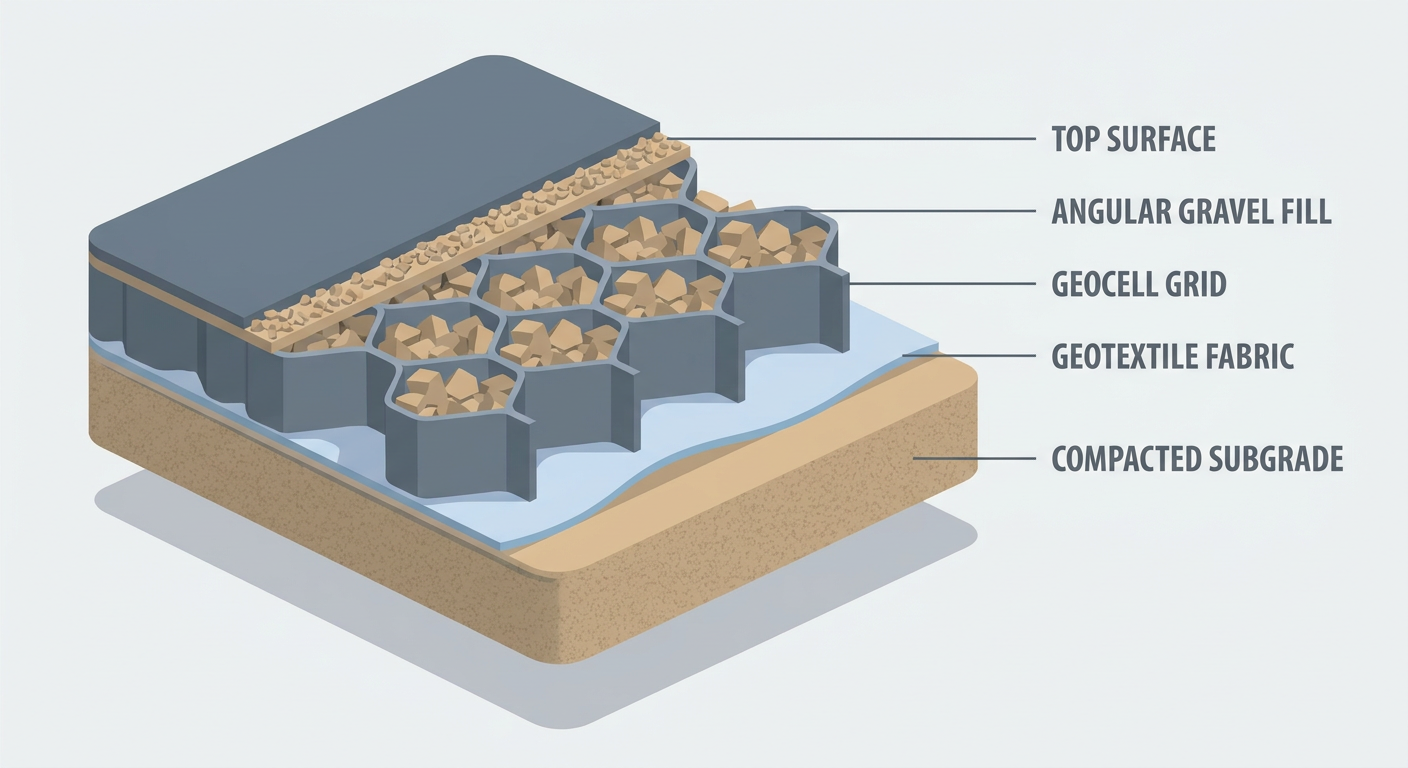
BaseCore™ geocell panels expand into a honeycomb grid pattern with cells measuring approximately 8 inches wide by 8 inches long. When filled with gravel, each cell becomes an individual containment unit. The aggregate physically cannot migrate laterally because the cell walls prevent it.
This matters during storms because water flowing across the surface encounters resistance at every cell boundary. Instead of picking up speed and force as it travels downhill—which is exactly what causes erosion—the flow breaks up and slows down. Each cell disrupts the runoff pattern, reducing the water’s erosive energy.
Load Distribution: Preventing Rut Formation
Vehicles and foot traffic create concentrated loads that compact and displace loose gravel. Over time, ruts form. Ruts channel water, and channeled water erodes. The geocell erosion control approach solves this by distributing point loads across multiple cells. The honeycomb structure functions as a unified load-bearing surface rather than individual gravel particles that shift under pressure.
This is why gravel driveways built with geocells don’t develop the twin tire tracks that become drainage channels in conventional gravel driveways.
Permeability: Managing Water Instead of Fighting It
Concrete and asphalt approach stormwater by creating impermeable surfaces that shed water somewhere else. This accelerates runoff, concentrates flow, and pushes the erosion problem to your property’s edges—or your neighbor’s yard.
Geocell systems remain permeable. Water infiltrates through the aggregate fill, passes through the geotextile fabric layer beneath, and reaches the subgrade at a controlled rate. This reduces surface runoff volume and velocity simultaneously. Research from Penn State Extension confirms that permeable surfaces can reduce runoff by 70-90% compared to impervious alternatives.
Ready to protect your property from storm damage? Shop BaseCore™ geocell kits at backyardbases.com/order-now or call 888-897-2224 for help sizing your erosion control project.
Step-by-Step: Installing Geocell Storm Erosion Control
A typical erosion control project covering 100-200 square feet can be completed in a single weekend with basic tools. Here’s exactly how to do it.
Tools and Materials You’ll Need
- BaseCore™ or BaseCore HD™ geocell panels (quantity depends on project area)
- Geotextile fabric cut 6-12 inches wider than project area on all sides
- Steel landscape stakes (included with BaseCore kits)
- Angular gravel (3/8″ to 3/4″ crushed stone—not river rock)
- Shovel, rake, and wheelbarrow
- Plate compactor (optional but recommended for vehicle traffic areas)
- Utility knife for trimming geocell panels to fit
- String line and stakes for layout
Step 1: Assess the Site and Plan Drainage
Walk your property during or immediately after rain to observe actual water flow patterns. Where does runoff enter the problem area? Where does it exit? Where does it accumulate? Document these with stakes or spray paint. Your geocell installation needs to work with these patterns, not against them.
For slopes, measure the grade. Geocell systems handle slopes up to 1:1 (45 degrees) for vegetated applications. For gravel-filled erosion control on driveways and paths, slopes of 1:3 (approximately 18 degrees or 33% grade) represent a practical maximum for DIY installation.
Step 2: Excavate and Prepare the Subgrade
Remove loose topsoil, organic material, and any existing failed gravel. Excavate to a depth equal to your geocell height plus 1-2 inches for the base material. For most residential erosion control, 2-inch BaseCore™ works for pedestrian areas, while driveway applications typically require 3-inch or 4-inch BaseCore HD™.
Grade the subgrade to match your desired final surface profile. For flat areas, maintain a 1-2% slope toward your designated drainage exit point. Remove any rocks, roots, or debris larger than 2 inches that could puncture the geotextile or create voids.
Step 3: Install Geotextile Fabric
Roll out geotextile fabric across the entire excavated area, extending 6-12 inches beyond the project boundaries on all sides. Overlap seams by at least 12 inches if multiple pieces are needed. The fabric serves three functions: separation (prevents subgrade soil from migrating into the aggregate), filtration (allows water through while retaining fines), and stabilization (provides a uniform base for the geocell panels).
Anchor the fabric with stakes or rocks temporarily to prevent shifting during geocell placement.
Step 4: Position and Expand Geocell Panels
BaseCore™ panels ship collapsed. Position the first panel at one corner of your project area and pull it to expand the honeycomb pattern. Stake the leading edge using the included steel stakes—drive stakes through the cell wall perforations at a 45-degree angle into the subgrade.
Expand additional panels and connect them using BaseClips or by weaving the cell walls together. Work from the staked edge outward so each new panel anchors to the previous one. On slopes, always start at the bottom and work uphill.
Use a utility knife to trim panels at project boundaries. The HDPE material cuts easily, and cells can be cut at any point.
Step 5: Fill with Angular Aggregate
Crushed angular gravel performs significantly better than rounded river rock for erosion control. The angular edges interlock within the cells, creating a more stable mass. Use 3/8″ to 3/4″ graded crushed stone—the mix of sizes fills voids and compacts well.
Fill cells completely, then overfill by approximately 1 inch. This overfill will compact down to cell height and provides a smoother final surface. Work in sections, spreading aggregate with a rake and checking that all cells are fully filled before moving on.
Step 6: Compact the Surface
For foot traffic areas, walking across the filled surface several times provides adequate compaction. For parking pads and driveways that will handle vehicle traffic, use a plate compactor to consolidate the aggregate. Make two to three passes across the entire surface.
After compaction, add additional gravel as needed to bring all cells back to full. The surface should be level with or slightly above the cell walls.
Step 7: Address Edges and Transitions
Install steel landscape edging along exposed boundaries to contain the geocell system and prevent edge erosion. Where your geocell surface meets lawn, garden beds, or other surfaces, the edging creates a clean visual transition and prevents aggregate migration.
Fold excess geotextile fabric up against the edging and trim. This prevents undermining at the edges during heavy runoff.
Common Mistakes to Avoid
- Skipping the geotextile: Without fabric separation, fine subgrade particles pump up into the aggregate during rain cycles, eventually clogging drainage and destabilizing the base
- Using round river rock: Smooth stones roll and shift within cells instead of locking together—defeating the purpose of cellular confinement
- Under-filling cells: Partially filled cells allow gravel to migrate within the cell, reducing stability and creating an uneven surface
- Ignoring water exit points: Your geocell installation manages water flow but doesn’t eliminate it—ensure runoff has somewhere to go that won’t cause downstream problems
Choosing the Right Geocell Depth for Your Erosion Project
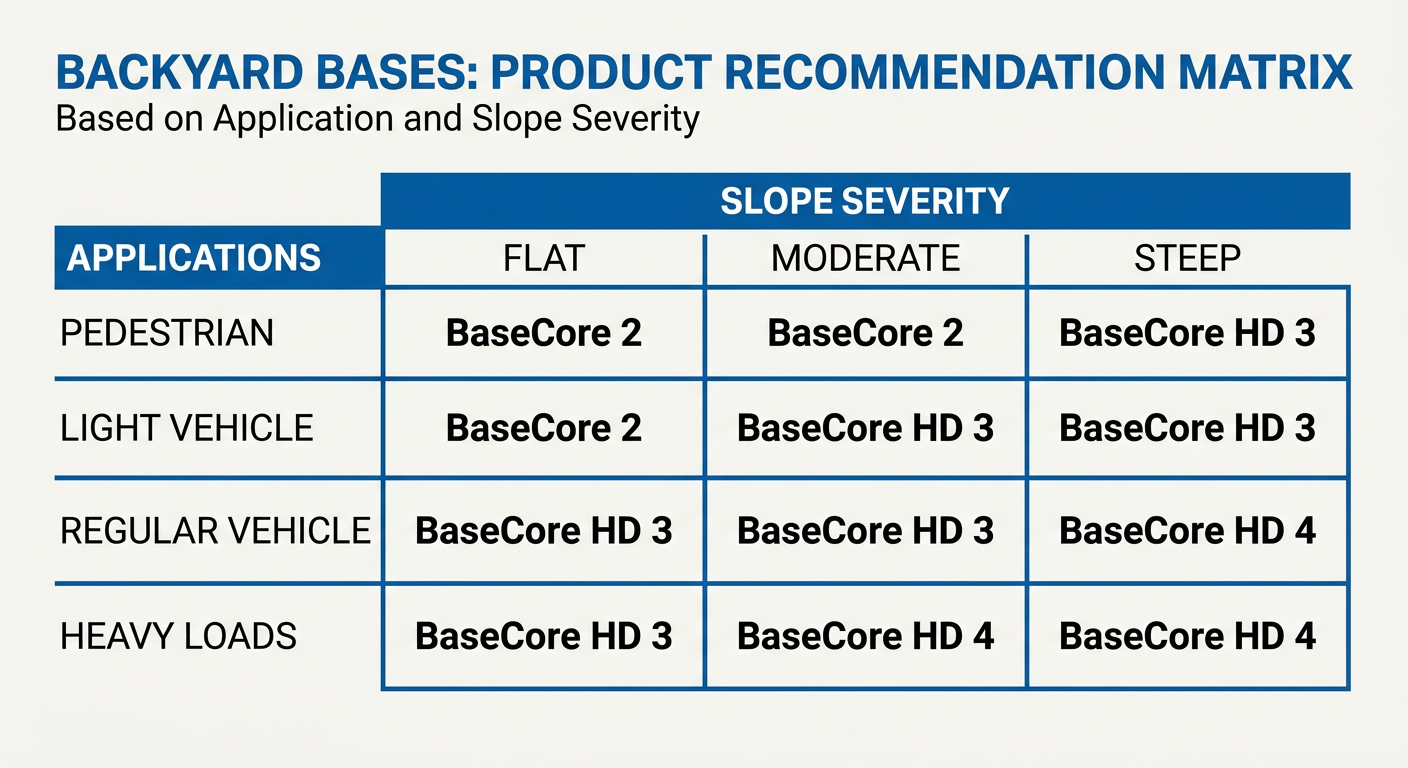
The appropriate geocell depth depends on traffic type and slope severity.
Application Recommended Depth Product Pedestrian paths, garden areas 2 inches BaseCore™ 2″ Light vehicle traffic, residential driveways 3 inches BaseCore HD™ 3″ Regular vehicle traffic, moderate slopes 4 inches BaseCore HD™ 4″ Heavy loads, steep slopes, commercial 6 inches BaseCore HD™ 6″
For slopes, increase depth by one size category from what traffic alone would require. A driveway on flat ground might use 3-inch geocell, but that same driveway on a 15% slope should use 4-inch for additional stability.
Can Geocells Handle Severe Storm Events?
Properly installed geocell systems have survived hurricane-level rainfall events. The key factors are correct installation depth for your slope and traffic, full cell filling with appropriate aggregate, and adequate perimeter anchoring. For properties in hurricane-prone or high-rainfall regions, consider upgrading to BaseCore HD™ at the next depth category from minimum requirements as added insurance.
The Federal Highway Administration has documented geocell use in roadway and slope stabilization projects for decades, validating the technology’s performance under severe conditions when properly engineered.
How Much Does DIY Storm Erosion Control Cost?
Geocell erosion control typically costs less than half of poured concrete for equivalent coverage, with significantly faster installation and no curing time. Use the Backyard Bases foundation calculator to estimate material quantities for your specific project dimensions.
Factor in the long-term cost comparison: concrete cracks and requires periodic replacement. Asphalt needs sealing every few years. Loose gravel needs replenishment annually. A properly installed geocell system requires essentially zero maintenance once completed—the aggregate stays where you put it, storm after storm.
Do I Need a Permit for Erosion Control Projects?
Requirements vary by municipality. Most residential erosion control projects on existing property do not require permits, but projects affecting drainage patterns, connecting to municipal stormwater systems, or exceeding certain square footage thresholds may need approval. Check with your local building department before beginning work, especially if your property is in a designated flood zone or near wetlands.
The permeable nature of geocell systems sometimes qualifies for stormwater management credits under local environmental regulations—another advantage over impervious surfaces.
Can I Install Geocell Erosion Control on Existing Gravel?
Yes, with proper preparation. Remove the top 2-4 inches of existing gravel—this layer typically contains the most fines, contamination, and poorly graded material. Excavate to solid subgrade, install geotextile fabric, place geocell panels, then backfill with fresh angular aggregate. You can reuse the excavated gravel as sub-base material beneath the geotextile if it’s reasonably clean, reducing material costs.
This approach works well for driveway erosion control where the existing gravel base is fundamentally sound but keeps migrating or washing out at the surface.
Protect Your Property This Storm Season
Storm erosion is progressive—each rain event makes the next one worse. The gully that forms this spring will double in size by fall. The gravel that washes to the bottom of your driveway this month takes more gravel with it next month. Waiting costs more than acting now.
A geocell ground grid system addresses the root causes of erosion: unconfined aggregate, unmanaged water flow, and weak subgrade support. Installation takes a weekend, requires no specialized equipment, and creates a permanent solution rather than a temporary fix.
Order your BaseCore™ erosion control kit at backyardbases.com/order-now or call 888-897-2224 to discuss your project with our team.
Frequently Asked Questions
How deep should geocell be for erosion control?
For pedestrian areas and light erosion control, 2-inch BaseCore™ provides adequate stability. Driveways and vehicle traffic areas need 3-inch or 4-inch BaseCore HD™. Steep slopes and heavy load applications require 6-inch BaseCore HD™. Always increase depth by one category when combining slopes with traffic loads.
Will geocells prevent erosion on a steep slope?
Yes, geocell systems handle slopes up to approximately 33% grade (1:3 ratio) for gravel-filled applications. The cellular structure locks aggregate in place while disrupting water flow patterns that cause erosion. For slopes steeper than 33%, consult with Backyard Bases about vegetated geocell options or professional engineering assessment.
What type of gravel works best in geocells for erosion control?
Use angular crushed stone in 3/8-inch to 3/4-inch sizes. The angular edges interlock within the cells for maximum stability. Avoid rounded river rock or pea gravel—smooth stones roll and shift under water flow, reducing the erosion control effectiveness of the cellular confinement system.
How long does a geocell erosion control system last?
BaseCore™ and BaseCore HD™ geocells are manufactured from UV-stabilized HDPE that resists degradation for decades. Unlike loose gravel that needs annual replenishment or concrete that cracks within 10-15 years, properly installed geocell systems provide permanent erosion control with essentially zero maintenance requirements.
Can I install geocell erosion control myself or do I need a contractor?
Most residential erosion control projects are DIY-friendly. A typical 100-200 square foot area can be completed in a single weekend with basic tools: shovel, rake, wheelbarrow, utility knife, and optionally a plate compactor rental. No heavy equipment or specialized skills required—BaseCore™ panels expand, stake, fill, and trim to fit any shape.
